
I am so ridiculously pleased with myself that I want to invite you all over for coffee to admire the success of my Sunday DIY project. However, I know that by the time you all get here, the house will no longer be clean and worthy of company. Also, not sure how many of you are still reading. More than 10? We’re gonna run out of sofa!
This project has been simmering in my busy wee brain for a while now. The central dilemma was a lack of a workspace for me. I do all my photo editing and all my computer work slouched on the sofa with the laptop (and USB chill mat) perched on my lap. I wanted to edit photos like a big girl, with a tablet and even (gasp!) a dedicated monitor — and despite having a rather expansive lap, it’s not *that* big. So since we moved in here a mere year and a half ago, I’ve been musing on potential solutions.
Eventually, I decided that if we moved a bookcase, I could carve out a wee bit of space between the living room and the dining room. This is ideal because while I do not particularly like working slouched on the couch, I do spend a LOT of time on the computer, and being somewhere in the centre of the house is far more appealing than being locked away in my bedroom or the basement.
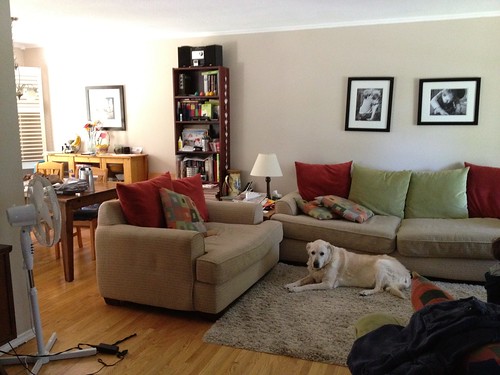
This is the “before” shot — the tall bookcase is about to disappear. Please overlook the state of the rest of the room. (Note to self, clean house before taking “before” shots, too.)
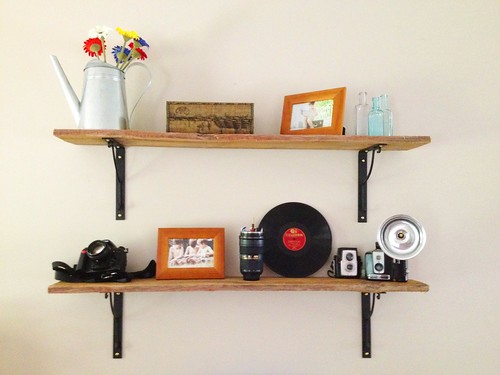
I didn’t want a traditional desk, and started looking for a vintagey sort of console table. Someone (was it you? Speak up and take credit!) on Twitter suggested building my own desk from some reclaimed barnwood from the Wood Source. I thought that was a spectacular idea; Beloved guffawed. In the end, we were both right. I did visit the Wood Source, and I did buy an amazingly vintage, weathered seven foot length of reclaimed barn board, but I turned it into shelves instead of a desk. And friends (thank you Younes and Amanda) donated a cast-off Ikea computer table. The table may one day be replaced by a future flea market or garage sale antique treasure, but in the interim it does a spectacular job of holding up the laptop in a most unobtrusive sort of way — exactly the job I require of it.
I should mention that I have a bit of a fear of hanging things on the wall. In our old house, I could hang a four-ounce cardboard photo frame and have it fall off the wall. I had those giant claw-shaped anchors pull out of the wall, leaving a gaping six-inch hole in the drywall. No matter what I hung, I destroyed the wall in the process. When I decided to use metal brackets, I knew I’d need anchors or to find the studs, so I went with the latter. And I needed a new drill-driver, because ours died. So I went to Wood Source for the board, Ikea for the brackets, Home Hardware for the screws and Canadian Tire for the drill-driver over the course of a couple of days. I measured and measured and measured one more time, then I cut, then I measured and marked and checked for studs, and measured and marked one more time.
And holy mother of carpentry, it worked!
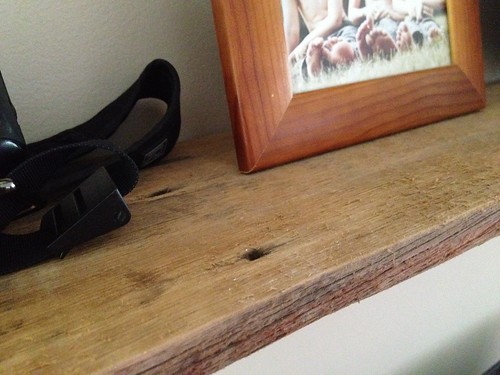
Here’s a detail shot — those are original nail holes, not re-try screw holes!
Here’s my new workspace. Isnt’ it awesome?
I’m sitting in that chair as I’m typing this. And *touch wood* nothing has fallen on my head — so far!
Awesome job!
Looks great, Dani! Love the wood!
Nice work, Dani! I have stacks of pictures and paintings to hang in our new house and hven’t gotten up the courage to try hanging them myself yet!
morning ,nice touch, clever girl! love to everyone, oxoxoo