How a chalkboard saves my sanity at dinner time every single day

Beloved called me at work the other day.

“I feel so lost, so adrift. I’ve lost my rudder and I feel like we’re directionless.” Nope, not an existential crisis – he was upset because it was three days after grocery day and the chalkboard where I faithfully write our weekly meal plan was still blank.

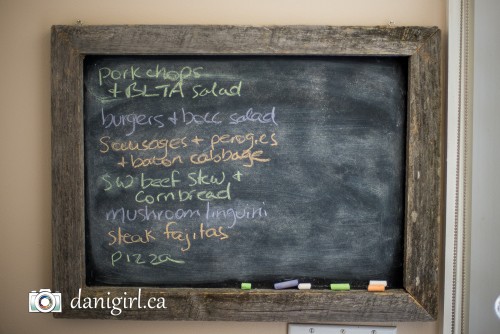
I love my kitchen chalkboard. LOVE IT! It has taken almost all of the stress out of weekday dinners. Not only do I know what’s for dinner every day of the week, but so does the family. It used to drive me bonkers that each boy would wander through whatever room I was in and idly ask, “What’s for dinner?” about three minutes after I’d finished apprising the previous kid of our dinner plans, or that it would be the first thing they’d say when they saw me right after school, occasionally before “hello”. I swear, I’d answer that question eight times in an average afternoon. We have three kids. You do the math. But now, they know – it’s written in chalk for all to see. (They still ask me, though. You can lead a kid to a chalkboard, but apparently you can’t make him read.)

chalkboard

I used to think I hated cooking dinner, until I realized that it was not so much the actual cooking that I hated, but the conceptualizing. So many cosmic tumblers have to fall into place for dinner to occur: you need to be able to pluck the idea out of the vast universe of potential meals, you need to have the ingredients on hand, you need to have the required prep time, and only then can you get on to the business of actually making dinner. The struggle is real.

The weekly meal plan takes all of that thinking and planning of the arsenic hours when you’re hungry and tired and cranky (YMMV, but I know I am all of those things between 4 and 6 pm on a weeknight) and puts them into a happier Saturday morning context surrounded by coffee and breathing space, and possibly rainbow-farting unicorns.

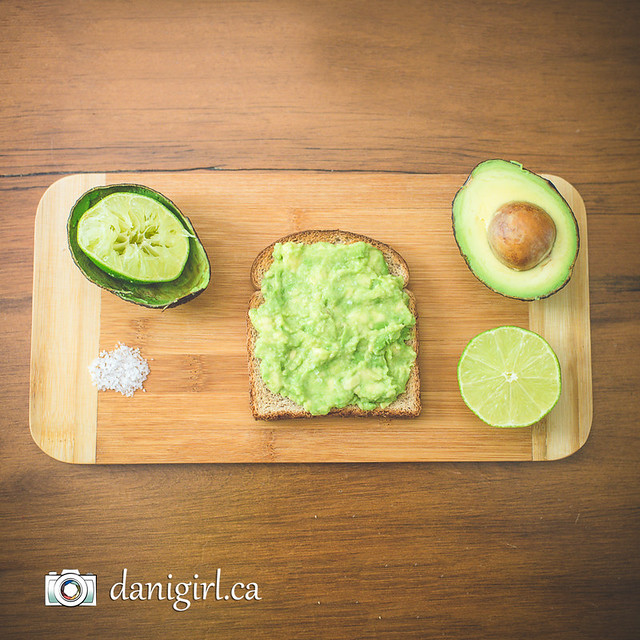
Hand in hand with the chalkboard comes the shopping list. I actually enjoy my Saturday morning meal and grocery planning ritual. About 20 minutes before I go out grocery shopping, I sit down with a coffee, a piece of paper, and my PC Plus points app. (I love PC points!) I start my list with things that are featured on the app for points that I would likely buy anyway, and sometimes I add a meal idea or two based on featured ingredients. Then I flesh out six or seven meals based on a big list of “things we like to eat” that’s stuck on the fridge with a magnet. Sometimes if I’m feeling inspired (or lacking inspiration) I’ll flip through my collection of Chef Michael Smith cookbooks, and if I’m really desperate I’ll peruse my Pinterest recipe boards (I have one for ideas to try and one for things that I know will work.) I fill in a shopping list based on what I’ll need to make those things, plus a quick scan of what I need to replenish in the fridge and cupboards. This always gives me a reasonably robust shopping list, and while I don’t religiously stick to my list, it does a pretty good job of getting what we need for the week without too many impulse buys or food that goes to waste.

As soon as I get home from the grocery store, I fill in the chalkboard with the week’s meals. I need to fill it in right away, as I find myself glancing to the corner frequently as I put the groceries away (or, more likely, as Beloved puts the groceries away) and making decisions about what goes into the fridge and what gets frozen for later consumption. Stuff heavy on fresh meat generally gets put into the rotation early in the week because I am a little unreliable when it comes to taking stuff out of the freezer – but the chalkboard helps with that, too.

I thought when I first started planning meals like this that I’d come up against my own fickleness (“but how can I be sure on Saturday that I’ll feel like tacos on Tuesday?”) but that really hasn’t been an issue. Sometimes we have pasta on Monday instead of Wednesday, and my ideas for Thursday or Friday tend to be a little more nebulous and based more on pantry staples than fresh food, so if we are going to go rogue and grab a take-out family platter from our favourite shawarma place instead, it’s likely to be on one of these nights. But I’d say we stick to the plan more than 80 per cent of the time.

I might have laughed at this “system” a few years ago but I rely on it now, and there are hella less dinner-time meltdowns since chalkboard arrived to save our sanity and guide us through the chaos. Clearly Beloved likes it, too, and I had to laugh when my brother and his family visited a few months ago and I noticed that someone had helpfully crossed off each of the meals we had already eaten during his visit.

Do you do this sort of planning? Could a chalkboard save your sanity, too?

Photo of the day: Avocado toast

It always tickles me when the various streams in my life converge and diverge.

A while ago, someone on Facebook made a passing mention of avocado toast. Specifically, avocado mashed with fresh lime juice and sea salt on toast. I’m pretty sure I drooled, and I can tell you for sure that I tried it right away and it rocketed up to one of my favourite breakfast/snack treats. Three of my absolute favourite flavours on crispy, crumbly toast? I may be drooling as I type this.

Then I was tickled a few days ago when I came across this article on The Kitchn: 11 Easy Ways to Fancy Up Your Avocado Toast, where the author waxes nostalgic “for the good old days when avocado toast was something novel, a little breakfast secret to share with friends. Avocado toast these days, well, it’s gone mainstream.” So avocado toast is not only delicious, but trendy? Who knew? (For what it’s worth, I am not overly enamoured by any of the 11 suggestions and will happily stick with the sublimely simple avocado, lime and sea salt.)

Any doubt that avocado toast was a genuine phenomenon was erased when Getty Images put out a request to photographers this week for images of — avocado toast. “Move over cereal! The latest coveted breakfast is avocado on toast!”

Who knew? Well, aside from me. And, erm, everybody.

But heck yes, I will take photos of my avocado toast before I stuff it into my hungry gob.

avocado toast

avocado toast 2

And, the other revelation of the day? Food photography is HARD, y’all.

Funny aside: the other photo themes Getty was soliciting this week were lighthouses and photos of your feet in various places. It’s like they were reading my mind, or at least my blog. I think I uploaded more photos to Getty this week than I have so far in 2015!

So anyway, back to avocado toast: have you tried it? Do you love it? Do you have a fancy variation that needs to be shared? If you’ll excuse me, I still have four avocados and limes calling my name…

How to manage your CSA share (alternate title: Learning to love the chard)

I am pretty excited that our community supported agriculture (CSA) share will start arriving soon. We’ve signed up for a half share, which means we get a massive load of fresh, local organic veggies every two weeks from June through October.

I laughed when I saw a recent post on Apartment Therapy with tips about how to prepare for your CSA share, not because I don’t think it’s a clever idea for a post, but because since this is our fourth year with Roots and Shoots, I wish I’d read something similar back in the day. The CSA share does take a little more managing than the average trip to the grocery store, but it’s so worth it!

CSA share in the fridge

I love our Roots and Shoots shares for many reasons, but one of the biggest is that it pushes us out of our culinary comfort zone. We’ve learned to love kale, kohlrabi, garlic scapes, fennel, brussels sprouts, Hakurei turnips, acorn squash and lots of other previously-intimidating vegetables. Which brings me to the point of my post today. There is one veggie that I know will show up in copious quantities in the share, one that I will almost always try to trade out for another share of kale or radishes or just about anything – one I have decided that I will embrace and learn to love once and for all. Can you help?

What the holy heck do I do with Swiss chard?

In the blog post from Apartment Therapy I linked above, there’s a passing reference to wilting it down: “Since it’s easier to store a few cups of chard than a few bunches, consider wilting them down as you get them and adding them to dishes as needed.” What does this mean? How do I achieve this space-saving alchemy, how long can I store it after I wilt it, and then what do I do with it?

Enlighten me, wise and sage (and marjoram) bloggy peeps – help us learn to love the chard!

In which she makes solid progress in her health and weight goals

Two months ago, on Easter Sunday, I pulled my FitBit back out of the drawer, where it had been taking a brief break from my wrist. I’ve missed my 10,000 steps per day goal only seven out of the 61 days since then. I’m pretty pleased with that!

FitBit steps graphic

I’ve really been working on overcoming my naturally sedentary nature. I try not to go more than 90 minutes sitting at my desk without getting up and moving around. My favourite work break is to get up, walk down to the main floor, across the length of the building, and back up the stairs to my fourth floor office. It’s surprising how clear your head gets after breaking away from a task and doing eight flights of stairs! I’m also working on getting a stand-up desk, and have jerry-rigged my current office set-up with stacks of dictionaries under the keyboard tray in the meanwhile. Not exactly ergonomic, but it will do for now.

I’ve also been pretty good at getting home from work in enough time to leave the car in the driveway and walk the kilometer or so over to the boys’ school to pick them up and then walk them home, or on days when time is short, hopping on my bike and cruising over to the school, then walking my bike home with the boys. One of my fellow moms at the school gate commented on how I’m always smiling and happy-looking as I walk up and I realized that it’s one of my favourite times of day – a peaceful transition from the work day to the rest of the day wrapped in an invigorating 15 minute walk. (And heh, the more late I am, the more invigorating the walk can be!)

I’ve also discovered hot power yoga, and have been doing that once a week faithfully for about three months. I seriously love it, and it’s become a sacred part of my week. My family has been great about accepting the twice-weekly gym visits and now weekly yoga classes, and Tristan is an excellent walking companion. (And my excellent, I mean long-legged setter of unforgiving paces that sometimes leave me struggling to keep up with him!)

My focus has really been on moving my sedentary arse, so while I’ve been conscious of my food choices, I haven’t exactly been dieting. There has been poutine and chips, and a healthy share of Beloved’s amazing cookies. (Oh the irony: as I have been busy teaching myself how to cook real, whole foods, he has been teaching himself how to bake like his grandmother did. I keep asking him to bake the cookies I like least, just to ameliorate the temptation. The cinnamon oatmeal chocolate chip cookies from Chef Michael Smith’s Family Meals cookbook are more than my feeble willpower can withstand!)

All that to say, while I have been making good choices, I haven’t really been depriving myself, and I have been seeing some pretty solid progress: I’m down 10 lbs over two months, and am at my lowest weight in a couple of years.

Screen Shot weight progress

You can see there has been a lot of two-steps-forward one-step-back, but that’s okay. I can feel the difference in how my clothes fit and even see the difference in the mirror – especially in yoga class, where I first flinched at my reflection months ago. I’ve got 2 lbs to go to my original goal, but if I go another 10 lbs I’ll be at my 10-year low, where I was circa 2009. That would be awesome, but what’s even more awesome is that I feel strong and healthy and proud of myself. And I had cookies along the way!

I’m doing anecdotal research about stand-up desks while I wait to see if the bureaucracy can cough one up for me. Are you using one? Any recommendations?

Is fruit juice bad for kids?

This is timely. I was just thinking about writing a blog post about kids and their drink choices when I came across this article in the Ottawa Citizen about how fruit juice may be dropped from Canada’s food guide as a healthy choice. The article illustrates two sides of the argument: on one hand, fruit juice does contain certain vitamins like vitamin C, folate and potassium, which makes it perhaps a better choice than straight soda or fruit punch. On the other hand, drinking a couple of cups of juice every day could comprise a quarter or up to half of a child’s caloric requirements – with questionable nutritional benefit.

I know from my own ongoing research into the healthiest food choices for myself and the family that you should in general try to avoid drinking your calories. There’s no doubt that eating an orange is a better overall choice than drinking a 125ml box of pure orange juice. But is it reasonable to ask kids to drink mostly water? And is an apple going to quench thirst like a cup of apple juice?

4:365 Club soda

I’m not too worried about the amount of juice the kids consume. A juice box in the lunchbox (gasp! I know, but I’m picking my battles) and a half a cup of apple juice at dinner don’t seem to be too unreasonable to me, even if they will add 100 or so “empty” calories. But as the boys get older, what I’m wondering about is the choice between sugary pop and the chemicals in diet soda. We’re aiming to be an ‘all things in moderation’ sort of household, so I don’t want to ban pop entirely, and I want the boys to (a) make reasonable choices and (b) be able to choose things that they find yummy and satisfying sometimes. While I don’t love the idea of them drinking 150 calories of sugar in a can of soda, I think the aspartame and other crap in diet soda could be worse for their growing bodies. Personally, whenever I can I avoid aspartame in everything except chewing gum, which usually means I’m choosing the full fat and full sugar versions of any product over the “lite” low calorie or low fat options. Sugar may be evil, but I’m convinced that artificial sweeteners are worse.

What do you think? Given a choice between the evils of sugar and the evils of artificial sweeteners, which one do you think is more harmful, even on an occasional basis?

Thoughtful eating: The Dorito Effect

From Michael Pollan to Mark Bittman to Michael Moss to Yoni Freedhoff to Michael Smith, I love being challenged to think about food in new ways. I found this Globe and Mail excerpt from a new book called The Dorito Effect: The Surprising New Truth About Food and Flavor fascinating.

It talks about how the foods we are supposed to eat (plants, animals – things that grow) are becoming less flavourful and things we should not eat (Doritos) are subject to endless billions of research dollars to make them more flavourful.

As humans mastered growing livestock and plants, however, we changed their ecological purpose. The reason animals produced meat wasn’t so that some human could eat it. Meat is muscle, which enables movement, and fat, which stores energy. Vegetables are the plant equivalent – structure and nutrient storage. A plant grew fruit or seeds not so that a human could bake pie but so that the plant could reproduce. Today, instead of eating living things designed by nature, we started doing the designing. And we got so good at it that food became very different. It’s a difference we still don’t fully understand but one we can most certainly taste.

I wonder if this is one of the reasons why everything from our Roots and Shoots CSA farm share tastes so damn good? It’s definitely part of the reason I’m willing to pay premium prices for most of my pork, chicken and beef through a butcher that supports local ethically, sustainably grown meat.

Beets and carrots

Only a couple of more weeks until our farm share starts coming in. I can hardly wait! I put a hold on The Dorito Effect through the library – 107 holds on 10 copies. I’ll let you know what I think when I get it!

Have you read other books like the In Defense of Food or Salt Sugar Fat that have changed how you think about food?

And, does it make me a horrible person if while I am pontificated about this, there is a wee tiny corner of my brain that said, “Wait, did somebody say Doritos?”

Culinary evolution via the hot turkey sandwich

The request was simple enough. Beloved mentioned in passing the other day how much he loves hot turkey sandwiches for dinner. No problem, I can do that. Back in the day, this would involve storebought turkey with a can of gravy beside oven-baked fries from a bag. Oh baby, how far we’ve come!

I have still never actually roasted a turkey, although I’ll probably try that one of these days. In the name of simplicity, I decided to go with the store-baked sliced turkey from Farm Boy. Have you tried it? SO GOOD and probably the next best thing to home cooked. On the menu plan, I scheduled hot turkey sandwiches for a day I knew someone would be able to swing by Farm Boy to pick up some fresh sliced turkey. And some kale for a salad. The kale is always so good fresh from Farm Boy. And potatoes, baking potatoes for mashing, because gravy.

I knew that the gravy would make or break the meal. In years past, I would have bought a can of gravy, but I have recently started making my own gravy, and it’s been decent. I knew I’d need some stock for the gravy base, since I wouldn’t have any pan drippings. I learned this year how to make stock by boiling leftover roasted turkey (thanks mom!) for soup, and I watched Chef Michael Smith make stock from a raw chicken not too long ago on a re-run of Chef At Home. (They run an episode of Chef At Home every day on the Food Network, and we PVR all of them. Every single one. Whenever we have a night with nothing else on, we watch an episode or three. I highly recommend doing the same if you (a) are as obsessed with Chef Michael Smith as we are and (b) want to learn how to cook straightforward and excellent meals for your family.)

So you can in theory make stock from raw chicken, but at the butcher a whole chicken runs approximately $14. That seems a lot for a pot of stock when you can buy a litre carton of the organic stuff for a couple of bucks. (I know, you can probably get cheaper chicken, but I’ve become a bit of a princess about my meat and try whenever possible to buy the ethically raised stuff from Manotick Village Butcher.)

I was in the grocery store with a $3 carton of organic stock on my grocery list when I had my eureka moment. Remember when I said I’m a bit of a princess about my meat? Yeah. When I was thinking about chicken (or turkey) parts for stock, I had been thinking about nice whole roasting chickens, or at least bone-in, skin-on chicken breasts. But in the meat aisle, I discovered all the sketchy bits are WAY cheaper. Deboned, skinless turkey breast is about $12 per kilo, but turkey necks and backs are about $4 per kilo, and this previously frozen wing and, erm, something was about the same. And from THAT I can make about six or eight litres of stock – which suddenly makes it both more cost effective AND more flavourful AND more healthy, because I am controlling exactly what’s in it.

You may be laughing at my eureka moment, and I’m okay with that. I’m laughing at myself because of (a) how ridiculously pleased I am with myself to have make these leaps of culinary development and (b) that it’s taken me 45 years to get here.

Here’s my $3.83 worth of turkey parts stock a-simmer on the stove:

Image: turkey simmering in a pot

Honest to god, it couldn’t be easier. You just dump the random turkey parts into a pot about 3/4 full of cold water with some carrots (I used baby carrots because that’s what I had, although I don’t usually buy them anymore) and celery that was a little coughLOTcough limp and some onion flakes because dammit, how are we out of onions again? Oh, and a bay leaf and a wee bit of sea salt. And oh my holy turkey, does it ever smell good!

You have to skim off the floaty bits every now and then, and leave it just at a simmer, not a boil, for a couple of hours. I’ll let it cool, and skim again, and then strain into two containers. One will get turned into turkey gravy with a little butter and flour for dinner, and the other will end up in a ziploc bag in the freezer until the next time I need stock for soup or gravy. If the meat weren’t the nasty bits, I’d even pluck it off the bones and add it to the freezer batch too, but, well, remember what I said about being a bit of a princess about my meat? I’ve got my money’s worth with the stock and gravy, and the rest can go in the compost.

So, is this as huge of a learning curve for you as it is for me, or am I alone in discovering what everyone else already knew?

Edited to add: Awesome tip from Foodieprints blogger Don Chow on Facebook: “if you broil the stock fodder (bones or wing) to colour (not cook) it a bit, you’ll get a darker stock…also, you can make stock in your slow cooker.”

Ingredient of the week: Home made vanilla extract

Here’s a fun and easy although not entirely inexpensive little project: make yer own vanilla extract!

DIY vanilla

You can thank Chef Michael Smith for this one. Beloved and I have been taping old episodes of his series Chef at Home from the Food Network and watching them on the weekends. One episode he made a passing reference to how easy it is to make your own vanilla extract as he shook a mason jar full of honey-brown liquid, and my curiousity was piqued.

I’ve already learned my lesson about vanilla extract. There are two kinds on the shelf in your grocery store: artificial and pure. When Beloved started to get into baking last year, I tried to cut corners and brought home an extra-large size bottle of artificial vanilla extract because I balked at the price of the pure stuff. As I’ve since learned, it’s worth spending the extra to get the pure stuff because it has flavour-enhancing properties (not to mention a heavenly flavour in its own right) that the artificial stuff just can’t touch. Artificial vanilla extract can be made from corn syrup, wood pulp, or various natural and artificial flavours.

The recipe for home made vanilla extract, it turns out, is ridiculously simple. It comprises a whole two ingredients: vanilla beans and vodka. And as I found out, both of those things are stupidly expensive.

That’s how I found myself in the LCBO, peering at price labels on vodka bottles and searching for the absolut cheapest brand. (Get it? Absolut? I slay me.) Holy crap, this stuff is not cheap! As I compared the prices of the various brands, it occured to me that this may be the first time I have purchased hard liquor. Oh the things I’m learning in my ripe old age!

Solution for extracting vanilla acquired, I found myself lacking only vanilla. I thought I might be able to find bulk vanilla beans at Farm Boy or Bulk Barn, but it turns out they both sell the variation of the same packages containing just two vanilla beans in the range of $5. I found a recommendation online to buy vanilla beans online from Beanilla, and managed to pick up 25 beans for just over $20.

So, to recap: artificial vanilla extract for approximately one cent per millilitre. Pure vanilla extract for approximately nine cents per millilitre. Home made vanilla extract for approximately four dollars per millilitre. This is starting to sound like the time I made my own baby food!

But, having finally acquired all the necessary components, I must say the actual making of the extract couldn’t have been easier. You will need: vodka or other liquid over 35% alcohol content, at least three vanilla beans, knife, 250 ml mason jar.

DIY vanilla-3

Split the vanilla pods down the centre to expose the itsy bitsy bits of beany flavour inside. I chopped mine further into thirds to make them fit better in my jar. Pour the vodka over the beans. Do not take a photo of this step as you try to balance camera in one hand and vodka in the other and press the shutter button with the third or you will pour several hundred expensive millilitres of vodka past the jar and onto the table, driving up your cost per millilitre another dollar or so.

DIY vanilla-4

Shake, shake, shake it baby – and you’re done!

DIY vanilla-6

You can see all the yummy wee vanilla beans floating around in there. Drool-worthy! Put it up in a cool, dark cupboard and forget about it, except for when you go in about once a week and shake it up. Ours is about two weeks old now and already a lovely rich dark brown and smells like heaven. I’ve read that you should let it steep for anywhere from four to eight weeks – I figure I’ll crack ours open just after the holidays and let Beloved have at it to try out in all his favourite cookie recipes.

So now you have to share – what’s your favourite use for vanilla extract?

Ingredient of the week: Sprout-yer-own lentils!

Did you know that if you take the regular old lentils that you find in the grocery store (the dried ones in the bag, not the canned ones) and a mason jar, you can grow them on the kitchen counter into crunchy, earthy deliciously green and crazy-good-for-you sprouts in just a couple of days? Lentils are already really good for you, but when you sprout them, I’ve read that the nutritional value more or less doubles. And honestly, the sprouted lentils taste about 1000 times better than regular old lentils.

Like just about all good things in my kitchen, this was inspired by (surprise!) Chef Michael Smith. I found this video on his website:

(The bit about sprouting lentils starts around the 6:45 mark, give or take 10 seconds.) Then, because I will always seek out a long and wordy tutorial over a video, I clicked around until I found these instructions for sprouting lentils linked from his website.

I loved this because it was a fun experiment, a family-friendly activity and an agriculture lesson all rolled up into one. And also? YUMMY! We started with a bag of organic green lentils, a bit of mesh (cheesecloth would work, but mesh or screen lets the air through better) and a big mason jar with a two-piece snap lid.

Sprouting lentils (1 of 4)

You take about a cup of lentils, maybe a little less (my one litre mason jar almost overflowed by day four of sprouting) and put them in the jar. Put the mesh across the top of the jar and screw the band part of the lid over it without the round centre piece. Fill the jar with cold, clean water and shake it around to rinse the lentils. Pour out that water (see where the screen and open lid comes in handy?) and then fill it back up again.

Sprouting lentils (2 of 4)

Then, walk away. Leave it overnight to soak. The next morning, drain thoroughly through the mesh and rinse the lentils under cold running water. This time, drain the lentils well and leave them again. Continue rinsing them twice a day and being careful to leave them wet but not sitting in water. You’ll see them start to sprout within a day or three. This is mine on day three:

Sprouting lentils (3 of 4)

After four days, they had grown sprouted and increased in size so much that they were pushing against the top of the jar lid. or else I might have let them go a wee bit longer.

Sprouting lentils (4 of 4)

I rinsed one last time, unscrewed the cap and replaced the mesh with the snap centre of the lid and put them in the fridge. Well, first I snacked my way through about a quarter of the jar. I sampled a few, and the earthy, crunchy and ever so mildly sweet green flavour totally took me by surprise. I do not love lentils, although I eat them because i know they’re nutritional powerhouses, but I DO love sprouted lentils. WOW!

The next day, I had this for lunch at work: sprouted lentils, spinach, parmesan and cherry tomato salad with a honey-sesame-balsamic vinagrette.

There is one caveat I’ve seen on articles about sprouting things yourself. If your jar or your lentils or your hands are not scrupulously clean, there is a risk of E coli developing. That’s why the twice-daily rinsing and not letting the sprouts sit in water is so important. Safety first!

So, to recap: easy, good for you, excellent family activity, great teaching point, yummy. It’s gardening for underachievers with micro-sized attention spans like me. Seriously, what’s not to love? Imagine having a countertop source of fresh, home-grown green veggies all winter long, and all you need is a jar and a bag of dried lentils! Now that we’ve mastered the lentil sprout, there are no shortage of beans and seeds I’d like to try sprouting: sunflower seeds, pumpkin seeds, alfalfa, barley, oats, almonds…

Have you tried sprouting? What were your experiences? Are you interested in hearing how we do with other sprouts? And if you have any favourite sprout recipes to share, I’d love to hear them!

Chef Michael Smith’s new Family Meals cookbook: a review and giveaway!

So I may have mentioned (cough cough) that I’ve become something of a fangirl of Chef Michael Smith lately. But please believe me when I tell you that even if I weren’t already predisposed to great affection for the towering chef from PEI, I would still rate his new Family Meals cookbook as the best one I have ever owned.

I was lucky enough to receive a free copy from Penguin Canada, and it arrived in the mail this weekend. How much do I love it? Let me count the ways!

  1. I love the emphasis on family. From lunchbox ideas to sharing tasks in the kitchen to appealing to finicky kid palettes, this is a cookbook written by a dad who happens to be a chef and who is passionate about cooking for and with family.
  2. It’s real food, and not even a little bit scary. I’ll admit it, we have very simple tastes and are collectively a little bit suspicious of foods we don’t know. While there are a few exotic ingredients here and there, mostly there are recipes for foods you and your family will love, like pancakes and street tacos and smoothies and baked beans and pulled pork and beef stew… it may be possible that I’m drooling just perusing the index again.
  3. The meals are quick and generally uncomplicated. While I am an initiate to life’s school of cooking, and I’m gradually building up my comfort level, I still don’t have the time or interest on a busy weeknight to invest hours on complicated processes. I’m sure the vast majority of these meals could be made in 45 minutes or less including prep time – which is just about exactly my attention span for anything in the kitchen – and I love that tips are woven into the sidebars on many of the recipes.
  4. He consistently emphasizes meals made from fresh, real ingredients sourced locally when available. This is so important to our family right now – meals made from food, not processed junk.
  5. I can think of no better proof that this cookbook was made with me in mind than finding not one, not two, but THREE of my own go-to recipes, but made oh so much better. Let’s just say those of you who look forward to an annual batch of home-made peanut brittle at Christmastime are in for a delightful surprise!

We’ve had this cookbook for less than a week and have already made a few of the recipes. Beloved whipped up a batch of Weekend Pancakes within the first 24 hours, and I kid you not, they were the best pancakes I’ve ever had. (Oh the hyperbole, I know – but I can’t help myself. I am genuinely this excited!!) They were so good we ate them before I could take any photos. Luckily, the fine folks at Penguin Canada were more than happy to allow me to share this photo from the cookbook AND allow me to share the recipe for you here.

Photo courtesy of Penguin Canada.

In the cookbook, Chef Michael charmingly divides the ingredient list into “Kid 1: the dry ingredients” and “Kid 2 (or parent): the wet ingredients,” just one of the many ways he encourages both cooking and eating to be a family affair. Here’s the recipe more or less exactly as it appears in the cookbook:

Chef Michael Smith’s Weekend Pancakes

Kid 1: The Dry Ingredients
1 cup (250 ml) unbleached all-purpose flour
1 cup (250 ml) whole-wheat flour
1 cup (250 ml) quick-cooking rolled oats
2 tablespoons (30 ml) baking powder
1 teaspoon (5 ml) nutmeg or cinnamon
1/2 teaspoon (2 ml) salt

Kid 2 (or parent): The Wet Ingredients
2 expertly cracked eggs
2 cups (500 ml) of any milk (dairy or otherwise)
2 tablespoons (30 ml) of vegetable oil or melted butter, plus more for the pan
2 tablespoons (30 ml) honey
1 teaspoon (15) pure vanilla extract

“While the kids get out bowls and measure the wet and dry ingredients, heat your largest, heaviest skillet or griddle over medium-high heat. Gas, electric, induction or campfire – strive for that magical mark just past halfway, where food sizzles and browns without burning.

“Share the whisk so you don’t have to wash two of them. First whisk the dry ingredients together, then give the wet team a turn. Switch to a wooden spoon and gradually stir the wet into the dry, letting everybody stir the works a bit and not worrying whether the batter will be mixed wrong. Just make sure the batter is evenly combined.

“Coat your hot pan with a swirl of vegetable oil. Spoon in the batter, filling the pan with any size or shape of pancakes. Cook until the bottom of every last pancake is golden brown before flamboyantly flipping the flapjacks. Continue cooking for a few minutes longer until the pancakes are firm. If need be, keep warm in a 200F (100C) oven while you repeat with the remaining batter, dealing with pancakes like you’re working the Vegas strip. Devour with lots of decadently melted butter and of course a long pour of real maple syrup – none of that Auntie-artificial corn syrup stuff for these high-grade pancakes. Serve and share!”

The oats and the addition of some whole wheat flour gives these a wonderfully nutty taste and substantial texture. Try them and let me know what you think!

I feel like my culinary horizons have expanded exponentially in the past year or two. Rather than seeing meal preparation as a chore to be endured, I am really starting to enjoy my time in the kitchen. Cooking real, wholesome food for and with your family is way, way easier than I could have ever imagined. Heh, turns out you can teach an old dog new tricks! 😉

Edited to add: wheeeeee, thanks to the fine folks at Penguin Canada I have an extra copy to give away! How would YOU like to win your very own copy of Family Meals? Just leave a comment on this post telling me your go-to family favourite meal.

Here’s the fine print:

  1. This is a giveaway for a copy of Chef Michael Smith’s new Family Meals cookbook. Trust me, you want to win this one!
  2. To enter the giveaway, simply leave a comment on this post (not on Facebook, must appear on danigirl.ca/blog) telling me your favourite family meal – no takeout, no pre-made frozen meals, no boxes. Real food meals please!
  3. One winner will be chosen at random from all comments posted.
  4. This giveaway is open only to residents of Canada, excluding residents of Quebec. (sorry!)
  5. This giveaway will run until 11:59 pm EDT on Friday August 22, 2014.
  6. If you win, you must be willing to share your contact information with me so I can arrange for delivery of the cookbook. Please leave a valid e-mail address in your comment – e-mails will not be used for any other purpose.

Disclosure: Thanks to Chef Michael Smith’s team and Penguin Canada. I love this cookbook, and the opinions in this post are 100% genuine.

Edited (again!) to add: Thank you to all who entered, but the contest is now closed. Congratulations to Jessa, lucky #13. Please check your e-mail!