I have to laugh when I look at the pictures I used to take when I was younger: as soon as whatever subject I was trying to capture was in the frame – anywhere in the frame! – I’d push the shutter button. Don’t get me wrong, it works — but if you take a few seconds to really think about what you want your final picture to look like, you’ll go from ‘taking’ pictures to ‘making’ pictures.
Each picture needs to have a focal point. The focal point is the subject, the centre of interest. What is your photo trying to say? You might even have a couple of focal points, but you should choose one main one and make sure that nothing else in the frame is more interesting, more noticable or otherwise taking attention away from that one point of focus.
The very hardest thing for me to do — still! — is the most important: slow down and really look at the picture you’re about to take. Kids are squiggley and wildlife doesn’t sit pretty for the camera and even landscapes change with variable lighting and tourists wandering into your frame and whatnot, it’s true, but if you take a few seconds to really look at the picture you’re about to take, I guarantee you’ll take better pictures.
Look into all four corners and along the edges of the frame. Is everybody in the frame who is supposed to be in the frame? Are there any tree branches sticking out of the sides of anybody’s head? If you moved a little bit to the left or the right, would you do a better job of including the Statue of Liberty in the background, or be able to exclude that ugly sign advertising pizza by the slice?
Try to see the whole picture, including the background and foreground. Include only the elements that add to your picture and – perhaps more importantly – do what you can to reduce or eliminate the things that might take attention away from your subject. (Do this by squatting down or moving from one side to another, by zooming in or out, or by getting closer to or further away from your subject. Turn your camera sideways, and see if that’s a better shot. Or, if you have a fancy camera, play with the depth of field to throw the background out of focus.)
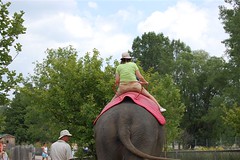
This picture favours neither me nor the elephant, but might have been
a more interesting composition if it showed less sky and the entire elephant.
Now you’ve taken a good look to make sure you’ve got an interesting viewpoint with all the good stuff in your frame and none of the bad stuff, and you’ve got your subject perfectly framed in the centre of your viewfinder. Ready? Don’t press that shutter!
For the most part, you should avoid placing your subject in the dead centre of your photo. I have a hard time with this one myself. There’s an old ‘rule’ called the rule of thirds, which basically says that you should try to place your centre of interest at the 1/3 or 2/3 point of your frame, either horizontally or vertically, to make the image more interesting.
Imagine lines dividing your frame into equal thirds, both horizontally and vertically, like a tic-tac-toe board superimposed on your photo. Putting your subject anywhere on those imaginary lines is good, but even better is the spots where those imaginary lines intersect. They call those four points the sweet spots, and placing your centre of interest over one of the sweet spots gives a picture just a little extra je ne sais quoi.

Lucas’s eye is just about where the top and left third lines would intersect.
I’m resisting the urge to throw everything I’ve learned about composition into one post, but it’s difficult to leave so much unsaid! We still need to talk about foregrounds and backgrounds, and using frames, and static versus dynamic, and using lines that you can see instead of imaginary ones… lots of topics to cover in the upcoming weeks, I guess!
I love these posts, btw. Some of the stuff, I know. Some of the stuff, I don’t. Most importantly, the info here forces me to slow down and think when I actually have the camera in my hand.
I think I need to start taking note or printing these posts out and put them in a notebook.
I’m learning so much!!! Thank you thank you thank you!
ANd I agree with Mad Hatter. I’m trying new things becuase of you…I’m going to have to blog to show the pictures that I take based on what I’ve learned.
That’s something I have a problem with myself.. composition. Like, my pictures from the zoo yesterday… the flamingo one, for instance. If you look at it, there’s a flamingo in the background with his head cut off. And the body of the main one on the left is cut off too. I should have spent more time waiting to get a good pic… but it smelled bad, was hot and I was in a rush.
Meanwhile, I do like off-centering pictures, but sometimes it’s hard to remember that when you’re just trying to get a good shot, especially if it’s of something that moves, lol!
Awww, thanks for the positive feedback. I feel a little out of my element giving advice, as I’m still so insecure about my own abilities. I’m so glad you guys find these useful!
I am really enjoying your tips… you’re a natural teacher (and a good writer to boot 🙂 ) I’m looking forward to getting more useful info.
Keep ’em coming! I find this very useful.