Happy @ home

It’s time to throw back the curtain on a fun new project the family has been working on through the summer! We’ve been selected as participants in IKEA’s Sustainable Living project. Through the project, IKEA invited ordinary Canadian families to use their products to live life in a more sustainable way. What does that mean? It means making simple changes to save energy, conserve water, reduce waste and recycle more, and make healthier lifestyle choices. Saving the planet and her people, one RYET lightbulb at time!

This project could not have come at a better time. As a family, we’ve been talking a lot lately about healthy choices, both for our bodies and for the environment. We’re also becoming more and more conscious about “stuff”: from product packaging to ethical sources to sustainability. In other words, we’re trying to be mindful of ourselves and our environment, in all the dozens of little choices we make every day.

And also, we love IKEA. Seriously. I’m sure more products in our house have come from IKEA than any other single retail outlet. There’s not a room in our house that isn’t tricked out with more than one IKEA piece, from a dresser I was given way back in 1989 (still going strong!) to our dining room chairs (bought from AS IS the month we got married in 1999, reupholstered twice over the years with fresh IKEA textiles and still used every single day) to a zillion lamps and shelves and storage baskets and decorative items to our freshly renovated SEKTION kitchen.

So working with IKEA on a sustainable living project was just about as perfect a fit for us as I could imagine. Plus, I love any adventure that starts with a shopping trip.

ikea-shopping-trip

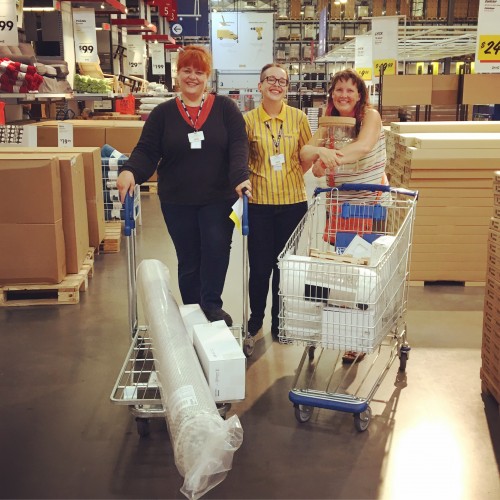
That’s me with my new BFFs from the IKEA Ottawa store. 🙂

ikea-choices

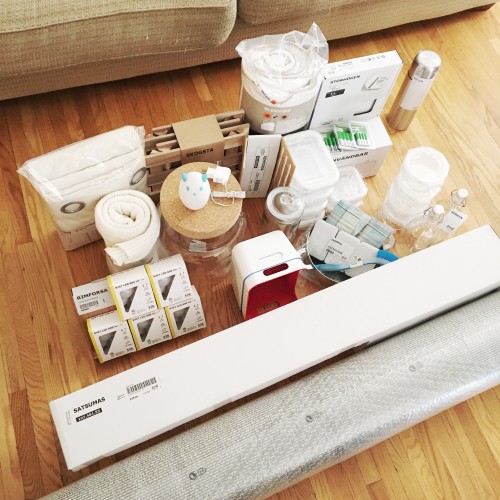
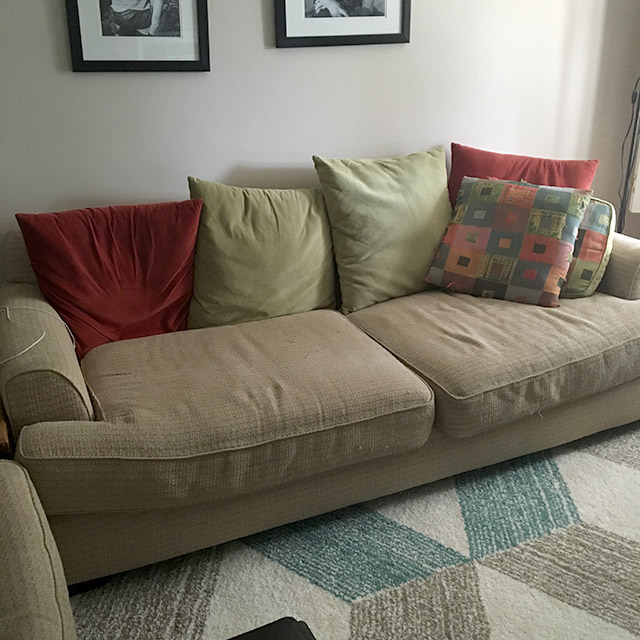
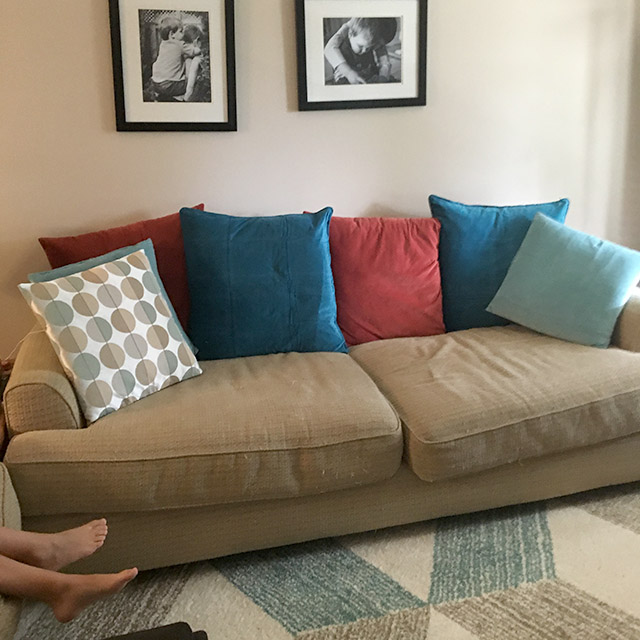
Our project has been focusing on three key areas: save energy (and $$$!), conserve water, and make healthier lifestyle choices. To that end, we’ve used IKEA products to make a handful of small but meaningful changes. We’ve switched our lightbulbs to energy-saving LED bulbs (did you know LED bulbs use 85% less energy than incandescent bulbs, and last up to 20 years?) and picked up a new cozy rug for the living room, a throw blanket and a warmer duvet so we can turn the temperature down an extra degree in winter. We’ve started using water decanters to keep in the fridge so we don’t waste water running the tap to get cold water – to say nothing of avoiding plastic disposable water bottles. And we’ve been using re-usable food containers to store leftovers and bring healthier lunches. These are just a few of the ideas and inspiration we’ve gotten through this project.

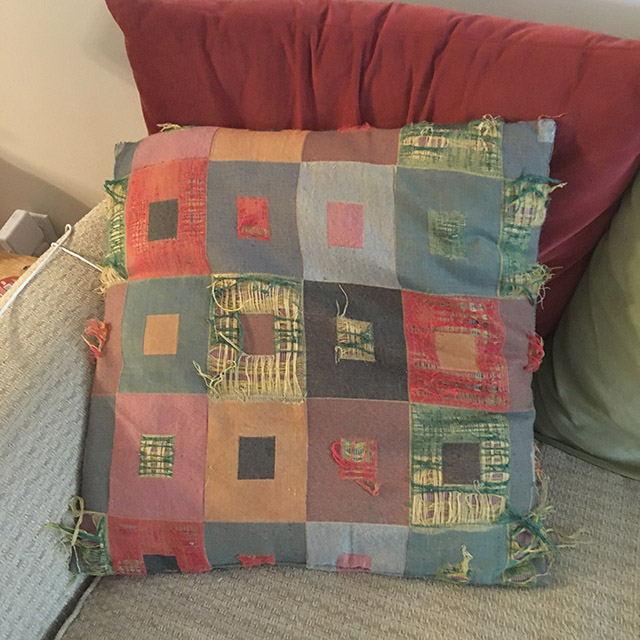
Want to know more, including one small change that will save us more than $100 each year on our hydro bill? Check out our project feed on the IKEA Canada Sustainable Living site. Some of the other participants have also been posting excellent tips for making better choices for people and the planet. My 10-minute update of our threadbare sofa cushions was inspired by, but not officially a part of, the sustainability project as well.

Disclosure: This is not a sponsored post, and writing about the project on this blog was not a condition of our participation in the project. In fact, I’m not sure IKEA knew I had a blog when we were selected to be participants.


{ 2 comments }

We’ve been meaning to do something about the sofa for quite some time now. Funny, not too long ago I came across the blog post I wrote in 2008 when we bought it. It’s been a great couch – oversized and slouchy, with plenty of room and plenty of tolerance for being at the hub of a busy life full of boys, dogs, cats, visitors, and a lot of spilled coffee.

blog Ikea old pillows and sofa

While it’s a comfy couch, it’s starting to look more than a little bedraggled. How did I let the pillows get to this state of threadbaseness? Life is busy, yanno?

blog Ikea old pillows

Also, I have to admit that the green and red colour scheme has worn almost as thin as the pillows. Since the first year we came back from PEI, I’ve had in my head that I’d like a “sand and sea” colour scheme in the living room. There’s no room for geometric green and red in my sand and sea vision.

A new sofa is simply not in the budget for now, though. As long as the existing one (and its durable chair-and-a-half companion piece, not shown) continue to do their jobs of keeping our collective toushies off the floor and are not visibly leaking stuffing or aggressively poking us with springs, we’ll tolerate the barely noticeable central sag in the frame.

We’ve been spending a LOT of time in IKEA this summer for a fun new project which will be announced anon. Part of that project was the rolling out of a beautiful new MARSLEV rug which DID match my vision of a sand and sea colour scheme, but which definitely did NOT match with the red and green cushions. You can see it peeking out under the “before” picture above. A new couch was not part of the project, nor were cushion covers. However, when I was perusing the Ikea website and saw not only that they had cushion covers that would fit both the large back cushions and the smaller cushions, and that they had them in colours that were within the realm of sand and sea AND harmonized with the new MARSLEV rug, I could not resist.

Originally, we were going to replace the red and keep the green to harmonize with the new blue cushions, but it was altogether a bit too cool. Instead, we kept the red for a bit of a PEI sandstone flavour, and covered the large green back cushions with a pair of deep turquoise SANELA cushion covers. We also covered the embarrassingly raggedy smaller throws with a pair of light blue SANELA covers, and kept a hint of green and beige with a contrasting OTTIL cover on the third one.

Whenever dealing with IKEA projects, I build potential exasperation with non-standard measurements into the plan. However, to my delight, each pillow fit snugly and exactly into the cushion covers. They were snug enough that I had to work to get them in, but that tautness makes the pillows look fresh and full.

Voilà, a brand new sand and sea colour scheme (and an end to those awful, threadbare cushions!)

blog Ikea new pillows

Total project cost: $62 in cushion covers, 10 minutes of effort. I’m so thrilled with the results! We’re now well on our way to that sand and sea colour scheme, AND we’ve averted the need to even consider browsing for new living room furniture for at least a year or so. That’s a huge double win in my books!

To my delight (and, let’s be honest, surprise) the colours pick up beautifully on the re-upholstered IKEA dining room chairs that I fixed up the last time I was feeling crafty. (Hey, I’m half Scottish and half Dutch; if I can extend the life of an existing piece rather than dump it in the landfill and buy more stuff, I’ll do that every single time!)

Stay tuned and I’ll tell you all about my new IKEA project soon!

(By the way, this was not in any way a sponsored post. I have been working with IKEA, but it was simply proximity to their products – and a lifelong love of IKEA – that inspired this instant-renovation.)


{ 4 comments }

We’ve arrived at the end of the first week of the great kitchen renovation project with sanity (barely) intact. In case you were wondering, it takes about a full week to adapt to the idea of not having a kitchen, and apparently longer to the idea of not having a sink, because I still catch myself moving toward where the sink used to be with the dregs of a can of soda or snack bowl to be rinsed or an apple to be washed.

We seem to be making good progress. We have passed through the destruction and discovery part of the remodel, which was definitely the most fraught with peril. We discovered several code violations in the wiring and a few outright fire hazards that added another chunk of change to the final bill for some electrical work, including no less than five (FIVE!) issues with the oven outlet alone. The previous owner’s habit of playing fast and loose with structural and electrical issues continues to haunt us six years after the fact, but at least the microwave hood fan will no longer vent to the gap between the walls (sigh) and we know that the household wiring is safer than it was before.

Here’s how we progressed each day of the renovation.

Day one was destruction and discovery day. Greasy stained drywall was removed, subfloor pulled up, mystery pipes were revealed, and electrical hazards became apparent.

Kitchen Day 1

Day two comprised more prep work, and the delivery of the bulk of the new cabinets and cupboards. Our dining room became a storage / staging area. Nerves frazzles and frayed.

Kitchen day 2

Day three was dedicated to electrical work. 15 amp wires that ran into 30 amp breakers were updated, dangling outlet boxes were secured, blatant code violations were remediated, and blessed routine was reclaimed from the chaos.

kitchen day 3

Day four brought fresh drywall and approved permits for the electrical, and a sea change from destruction to construction. Yay progress!

kitchen day 4

The one thing that the last week has illustrated is that we were insane to even consider taking on the kitchen renovation as a DIY project. There is no way we could have even identified, let alone dealt with, the issues that have come up so far. They weren’t devastating, and they were easily addressed by the contractors, but from tearing up the subfloor to the safety issues with the electrical, I have been grateful to have someone who knows what they are doing. Even if we did manage to install the cupboards and cabinets ourselves, it would have been putting lipstick on a pig because there were so many small but important structural issues that needed to be addressed so we could build upon a strong foundation.

I’m full of optimism for next week, which should bring subfloors and tile floors and fresh paint. I’m also relieved that the last of the major decisions has probably been nailed down, and I will no longer be frantically Googling various faucet models, ceiling fans and over-the-range microwave reviews. Trying to decide whether the drawer pulls need to harmonize with the sink fixtures may have been the nadir in decision-making “who really cares about this sort of thing?” hell, but we’ve made it through to the other side.

We’re managing meals with a mixture of takeout and sandwiches, and I bought more pre-packaged and processed foods in the grocery store today than I’ve probably bought in the last year. I honestly can’t remember the last time I bought packaged cookies, but hey, there were PC Points for Oreos today so I stocked up. An hour later, they’re already mostly gone, of course.

TL;DR? Week one was long and stressful, but could have been far worse. Having a team we trust doing the work has made all the difference in the world. And doing the dishes in the bathroom sink is far from ideal, but at least manageable. With the backdrop of the situation in Fort MacMurray playing out this weekend, I’m grateful to have my house intact and in one piece.

Stay tuned, the adventure continues on Monday!


{ 1 comment }

We’d just paid the deposit and signed the contract on our kitchen renovation, with work scheduled to begin in late May, when the contractor sent me an email. “We’ve had an opening and our next client wants to delay construction until June. How do you feel about starting on Monday?”

Um, Monday? Five days hence Monday, you mean? I looked up at the broken cupboards full of stuff that would need to be packed away, the clutter in the living room that would need to be removed to make way for a temporary kitchen, the dining room teeming with art projects and various paperwork that would need to be filed or recycled, and tried to wrap my head around the idea of having no kitchen to make meals or clean dishes for three to four weeks starting in five days. We’d have one weekend to finalize the last of the design plan (we need to pick flooring, a faucet, paint colour, counters and handles for the drawers and cupboards), pack the kitchen cupboards and drawers, empty most of the dining room, clear space in the garage for the delivery of the new cupboards, make a temporary kitchen, and plan a minimum of a week’s worth of no-stove meals.

“Sure,” I replied, because I have no sense of self preservation whatsoever. Carpe that diem, right?

We met with the contractor on Saturday to do a crash session on the remaining details: floors, counters, paint, faucet, and drawer and cupboard pulls. In other words, all the things that I thought were inconsequential. “I am more concerned with the fact of having a floor than what it looks like,” I told the contractor the last day we met to sign the contract. The contractor, who has gotten to know us fairly well by now, pointed at Beloved and said, “So, you’re coming with me to the tile store?” Meh, floors. Whatever.

To my surprise, though, picking out these finishing touches made me almost as excited as the idea of my coveted pot drawers. Since we are building on exactly the same footprint, with no new appliances, and on a very tight budget, I was really beginning to feel like the new kitchen might not be tens of thousands of dollars better than the old kitchen. Then I found out you can get ceramic tile floor that looks like knotty pine, and vintagey-cool drawer pulls that look like they might have come out of an old library. I am really happy now that I don’t have to wait for months to see it all come together, because for the first time I’m feeling really excited about the renovation, instead of just enduring it and grumbling about the cost.

Having said that, I am not looking forward to the next few weeks without a kitchen. We have our BBQ, which has a side burner for pots that I’ve never actually used but I checked and still works. We’ll have the microwave, although it will be displaced from its usual perch above the oven. And we’ll just roll the fridge into the dining room for the duration, so it will be accessible and functioning. I’ve picked up some big plastic bins to store food like cereal and snacks that might smell appealing to the dog, and I invested in a whackload of compostable paper plates. I think it is the dishwasher that we will miss most of all, and I am trying to decide whether washing dishes will work better in the (tiny) bathroom sink or the (awkwardly positioned and not incredibly clean) basement laundry sink or the bathtub is the least painful option.

Saturday and Sunday were a marathon of sorting and packing and discarding and wondering why the heck we have so many packages of yeast in the cupboard, and cursing the multitude of snack bags with less than six pretzels in each. I mostly stayed true to my inner environmentalist, filling the compost and cardboard recycling bins to capacity, but by late in the day Sunday I had abandoned any pretense of careful sorting and packing and was simply cramming stuff into any nearby container with capacity. And I swore to myself that we will never, ever move, because just packing the kitchen was enough to last me another decade.

Here’s the empty kitchen on Sunday evening, waiting for the destruction crew to arrive at 7 am on Monday morning. Before:

Photo 2016-05-01, 6 49 30 PM

After a full day of packing, trying to cook dinner on Sunday night in an empty kitchen was a bit of a disaster. You don’t realize how much muscle memory is involved in a familiar meal until you try to cook it when none of the tools or ingredients are where they are supposed to be! I can’t tell you how many times I opened a drawer or cupboard to find it empty – not unlike when the power goes out and you walk from room to room automatically hitting light switches and thinking “okay, I’ll watch TV – no wait, I’ll vacuum, no wait, I’ll….” Not to even mention the fun of meal planning for dinners that do not require a stove or much clean-up to execute. I’m seeing a lot of takeout and a lot of living room picnics in our future!

So tell me, bloggy peeps, what’s your favourite no-cook meal?


{ 7 comments }

We’ve had our dining room chairs for 15 years now. The summer we got married, we got them from the As-Is bin at Ikea, I know because the words “as is” are still written on the underside of them in indelible sharpie. For the $30 or so we paid for them, they’ve been worth their weight in gold – three moves, two dining room tables, three sloppy kids from high chairs to boosters to toddlers and beyond, and two puppies with the need to gnaw on things.

Back in 2007, when Tristan was five and Simon was three and Lucas was but a twinkle of an idea, the chairs were looking a little rough so I re-upholstered them. (Man, I have been blogging a l-o-o-o-n-g time! Blog is starting to outlast some of the fixtures and furniture!!) Seven years later, they were looking pretty ragged (actually, they started looking pretty ragged at least a year ago, and Bella did not do much to ameliorate the situation) and I’ve been idly thinking about re-re-upholstering them for quite a while.

Beloved and I were running errands in Ikea the other day and we found a pattern we liked, so I picked up three metres’ worth for the princely sum of $30. I vastly overestimated how much I’d need, but I figure I can stash the extras in case of emergency deployment of red wine or other indelible stain. If I were true to form, the bolt of material would sit untouched for months or perhaps years before I actually got around to doing anything with it, but it’s vacation season and my eyes were crossing from editing photos from my latest session, so I thought I’d see if upholstering the chairs would be as painless as I remembered.

Astonishingly, it was. Start to finish, stripping and upholstering five chairs took less than two hours. Here’s one “before” and one “after” chair – you can see why we thought perhaps it was time to re-cover them! I especially like the bit where the entire seam is torn out and you can see the original cushion. It’s only been like that for eight or nine months.

I had considered simply wrapping the new fabric around the earlier re-upholstery job, but decided it would likely be lumpy. The most time-consuming, if not difficult, part of the job was pulling out the staples and de-upholstering the 2007 job. I recruited minions to do that while I worked on the new upholstery.

The actual upholstering is dead easy. I cut the fabric into polygons the same shape as the cushion, leaving a margin of about a hand-width on all sides.

I centered the cushion in the middle and folded up one edge, doubling it over and tucking the raw seam under to make it a little stronger. One staple in the middle, turn 180 degrees and do the same on the opposite side, pulling the fabric taut but not so tight it pulled at the staples on the opposite side, then popped in another staple. At this point, I flipped the works over to make sure I liked where the pattern was centred and, erm, to ensure I was stapling the fabric right side up. (Never assume, my mother taught me.) I specifically chose this pattern because it would be very forgiving – no lines that must be straight, and the print pattern was random enough that it could go just about any which way, and small enough that it didn’t really matter where I centred the cushion. Very forgiving!

Once I was happy with how it was lined up, it was just a matter of doing the same to the other two sides and then stapling about a hundred more staples around each seam. Staples are cheap, don’t be stingy with them!

I didn’t take a close-up of the corners, but I more or less combined the way you tuck in a sheet to make hospital corners (I suck at making beds) with the way you make corners with gift wrap when you’re wrapping a present (I am much better at wrapping gifts.) The fabric is fairly forgiving, so I sort of made it up for each corner, but I did cut a triangle off the end of each corner to reduce the bulk of the fold. Just don’t cut too close to your edge or it will come untucked and fray. And staple the holy snot out of it.

I’m really happy with how they came out, and the fact that I managed to avoid stapling my finger to anything. I figure we’re good for another six or seven years. We’re certainly getting our As-Is money’s worth out of these chairs. 🙂 And then to top off a productive day, I made slow cooker bacon jalapeno beans, roast pork tenderloin wrapped in bacon (thank you Chef Michael Smith!) and roasted Roots and Shoots summer veggies – potatoes, onions, beets and carrots. Damn, I should take a vacation more often!


{ 0 comments }

We went back to Thomas Tree Farm in North Gower (rapidly becoming our favourite!) to get our Christmas tree this weekend. It was a little bit on the crazy busy side, but we still had a great morning out. I love that the boys are big enough to start taking on some responsibility for the carrying of the tree (and saw) if not yet for the actual cutting.

(I also love that they mostly tolerate and occasionally even pose for me when it comes to photos.)

Christmas Tree Quest 2013

Christmas Tree Quest 2013

Christmas Tree Quest 2013

Christmas Tree Quest 2013

Christmas Tree Quest 2013

Christmas Tree Quest 2013

Christmas Tree Quest 2013

Christmas Tree Quest 2013

Christmas Tree Quest 2013

Christmas Tree Quest 2013

Log jam at the tree farm

Christmas Tree Quest 2013

And today we decorate!


{ 1 comment }

Curse you, Michael Pollan!

11 June 2013 Eating and thinking and thinking about eating

When I read Michael Pollan’s book In Defense of Food: An Eater’s Manifesto in 2008, it radically changed how I thought about food and eating. I took to heart then and still try hard to live by his simple prescriptive advice: “Eat food. Not too much. Mostly plants.” Every time I visit the grocery store, […]

16 comments Read the full article →

The one where she set the stove on fire

15 April 2013 Happy @ home

We’ve had the new oven for maybe three or four months now. I like it, which makes it seem even more odd that I’d set it on fire. My first kitchen fire EVER, no less. I know, lousy cook and hopeless klutz that I am, you’d think kitchen fires would be a regular occurence for […]

6 comments Read the full article →

A very long ramble about about the time the coffee maker died and she lost an entire Sunday to the quest for a new one

25 March 2013 Consumer culture

On a Sunday morning already off to a rocky start by virtue of it starting at 5:15 am, and further compromised by the need to stand barefoot outside on the frozen patio bricks in nothing but a nightgown trying to encourage a suddenly willfull puppy to pee on the outside instead of the inside of […]

7 comments Read the full article →

In which she decides that maybe she doesn’t like living in the countryside so much after all

13 November 2012 Happy @ home

Annual leaf rake-up, Bag 1 What a gorgeous day to be outside. Yanno, I really don’t mind raking up the leaves. I rarely have an excuse to come out and enjoy the yard this time of year, and it will be a long cold winter. It’s nice to be able to get out and do […]

7 comments Read the full article →