In which Lucas gets his Hogwarts acceptance letter

This has definitely been the year of all things Harry Potter in our lives. I’ve been reading the series to Lucas for more than a year (we’re about half way through the Half Blood Prince), and our trip to England last summer was pretty much based on cramming in as many Harry Potter references as we could manage, including a visit to the Harry Potter experience at the Warner Bros studio.

And since Lucas turned 11 years old this week, it seemed only fitting that he receive his official letter of acceptance from Hogwarts. It was surprisingly easy to make our own custom, personalized acceptance letter to the famous school of witchcraft and wizardry!

The Harry Potter wiki gave me the wording I needed. I found the Hogwarts logo on the wiki and used it for the header.

Personalized Hogwarts acceptance letter

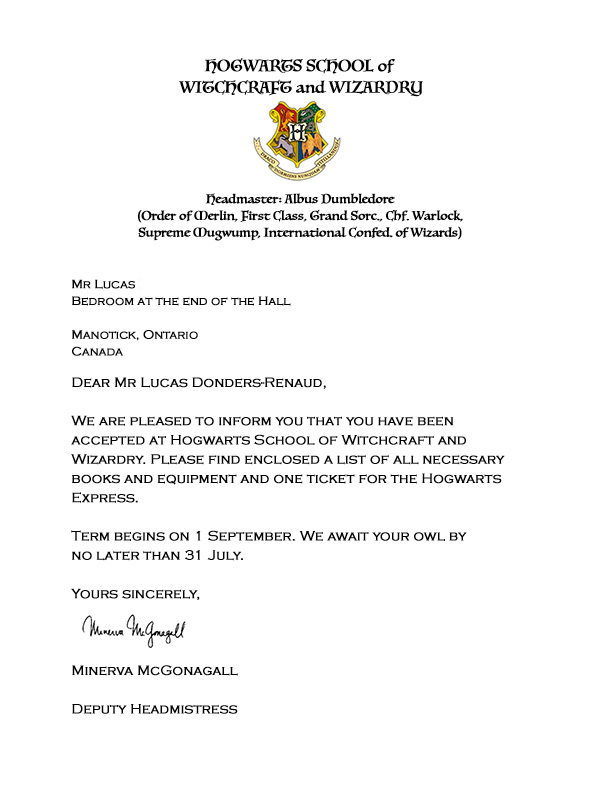
It was short and simple, so I decided to add the second page with required list of supplies and books as well. This time I used the Hogwarts crest as a watermark. The wiki even had the signatures for Professor McGonagall and the Chief Attendant of Witchcraft Provisions. Details make the illusion hold together!

Home made Hogwarts acceptance letter

I picked up a small pack of parchment-like paper at the stationery store, but you could easily print it on regular, thick paper and use a wet teabag to give it a little colour and character or even burn the edges a bit. The fonts, in case you were wondering, are Luminari for the Hogwarts header text and Copperplate Gothic Light for the body text.

The question of how to deliver it was a little bit trickier. Dangling in the fireplace seemed like a fun but potentially messy option. When I started thinking about owl post, my first inspiration was borrowing an owl stuffie from friends, and then I realized that all three boys are collectors of the Funko POP figures, and a plan was born.

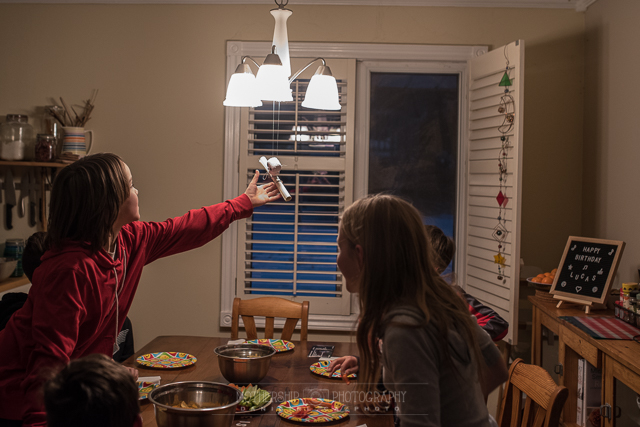
A little fishing line, a bit of shiny ribbon and the chandelier helped our new Hedwig POP figure deliver the scroll tied to her ankle containing the letter from Dumbledore.

Hedwig delivering custom Hogwarts acceptance letter

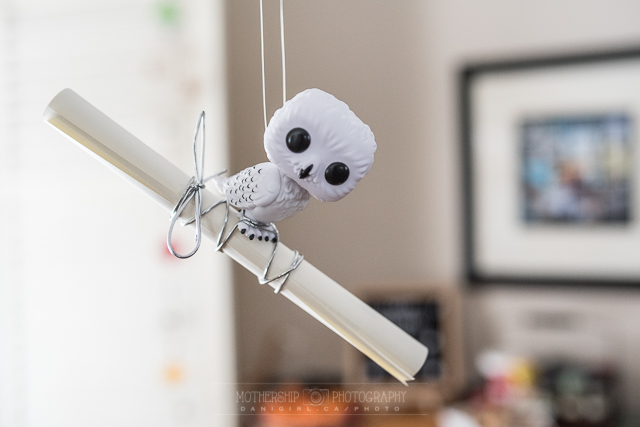
She’s a little small. In truth, she looks more like Pigwigeon than Hedwig. But, she did an excellent job delivering the letter, right at the beginning of Lucas’s birthday party. His friends noticed her before he did!

Lucas gets his Hogwarts letter from Dumbledore

Hedwig delivering custom Hogwarts acceptance letter

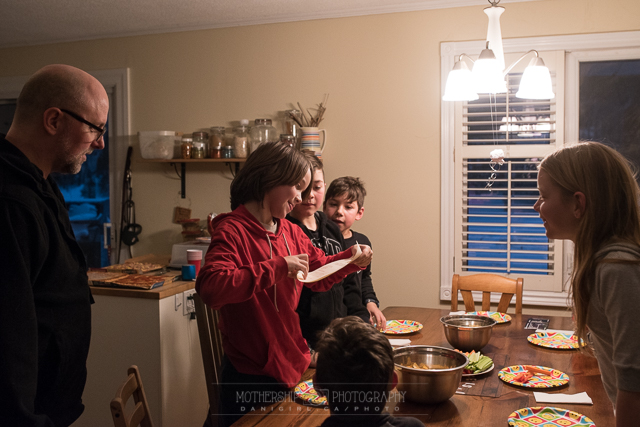
I love the look on his friends’ faces!

This was an easy and fun gift for an avid Harry Potter fan. I only wish I’d thought of it three boys ago! (And yes, I know that strictly speaking, the Hogwarts letter of acceptance doesn’t need to be delivered on one’s 11th birthday — but it was fun that we could make it work!)

If you have any questions about how we pulled this together, or suggestions that will help someone else do a better job, please don’t hesitate to comment!

Sea glass mobile tutorial

Remember this? This was the bounty of sea glass that turned us into junkies way back in 2010 on our trip to Nova Scotia.

512:1000 Our sea glass collection

Since then, we’ve added to our hoard from PEI to Vancouver’s Stanley Park, but I never did do anything more creative with it than keep it in glass jars stashed around the house. Not even terribly nice glass jars. Oh the shame! Every now and then I’d pull it out and sort through it, feeling rather like Gollum muttering “my precious sea glass” as I sniffed the last vestiges of salt from the pieces.

Three things happened to inspire me to finally do something with our collection. The first was adding to our collection in Souris, PEI. The second was a bit of spare time on my hands, thanks to the vacation entitlement that comes with 24 years of service. And the third was — Pinterest. One day it occurred to me to search for sea glass crafts on Pinterest and I was immediately smitten with the idea of a sea glass mobile. I didn’t want to start drilling the glass or playing with wire (although I’ve still got a LOT of sea glass so I’m not ruling that one out!) but I did love the idea of simply using string and glue. Easy peasy, right?

Of course, actually executing the plan turned out to be a lot more complicated than I’d anticipated. I set out to get some stretchy filament like you’d use in making a bracelet from the Sassy Bead store downtown. The clerk there recommended against stretchy filament (more prone to breakage) and instead sold me a couple of meters of what seemed like very fine fishing line. I also picked up some E6000 adhesive. I’m not sure where I got that idea from – probably a random Pinterest link. The idea was to tie a piece of glass, tap in a blob of E6000 to hold the knot, tie on the next piece, etc etc etc.

Ha. Not so much. The fishing line nearly drove me batty as I tried to tighten and knot the loops around the sea glass. I tried on two separate occasions to make it work, and got frustrated before I could get three or four pieces on the line. Finally, I reached out through Etsy to Rebecca Long, whose work had inspired me in the first place. She was nice enough to point me in the direction of this episode of Martha Stewart Living (confession: first time I have every watched this show!) with a sea glass mobile tutorial.

So here’s what I learned about making sea glass mobiles from Rebecca and Martha:

  • use braided fishing line. It’s way easier to knot, but also difficult to cut. I got mine at the Manotick Bait and Tackle shop – first time in four years of living around the corner I had the opportunity to visit their taxidermy-filled shop. o_O
  • use a glue with a built-in brush. I gave up on E6000 and a tooth pick in favour of Lepages with a brush and it made a world of difference. And miracle of miracles, I did not once glue my fingertips together.
  • lay out your pieces of sea glass ahead of time.
  • leave twice as much of a lead (for tying to the driftwood or other frame) as you think you will need, and then double it again.
  • take your line and make a simple loop over your fingers, pulling the end through the loop to start a knot. Slip your fingers out and the glass in, and make a knot tight against the top of the piece of sea glass, then fold the tail down alongside the thread. Brush from the knot to the bottom of the glass along the two threads with glue.
  • move on to the next line and repeat on all your threads, then go back and put the second piece on the first thread.

sea glass mobile-2

In the end, I bought three types of twine and two types of glue, and it took about four hours of futzing about before I finally started making progress. What you see here actually only took about 60 minutes, once I got a good rhythm going. I love how it turned out! That’s an authentic piece of PEI driftwood, by the way. I picked it up exactly with this purpose in mind.

I also found a better way to store the left-over sea glass. Did I mention I have a new addiction for vintage mason jars?

sea glass_

So now we HAVE to go back to PEI to collect more sea glass, so I can make more mobiles! 🙂

sea glass mobile

Once I got the details sorted out, this was a surprisingly easy craft – what a great way to show off your summer treasure, right?

Entertaining bigger kids while the wee one naps – inspiration from Fisher-Price

I was thinking the other day how great it is to be out of the nap zone with our kids. It used to be tough balancing playtime for the bigger kids with nap time for those who needed it. When my friends at Fisher-Price suggested a post on summertime fun this month, I thought it would be great to have a few suggestions for backyard fun you can set up for your older kids while the wee ones nap.

1. Bath toys in the swimming pool

This works well with a kiddie-sized swimming pool but you can also change things up by filling up a largish plastic sweater box with water, some bubbles and a few favourite bath toys. HOURS of entertainment, I kid you not. The Floating Island Bathtime Adventure is great for this, and the Little People always seem to enjoy a swim.

2. Backyard photo shoot

Send your future photographer out to document the progress of your flower or vegetable garden, or the dandelions, or whatever else is out there. It’s no secret we love our Kid-Tough Digital Camera!

IMG_0122_1

3. Kid-sized obstacle course

For extended play value, encourage the kids to help you in the set-up of a backyard obstacle course. Jump off the table, kick a ball as far as you can, ride your Kid-Tough trike in a circle, do a somersault across the grass, weave between a row of lawn chairs… and freezies as a prize for all competitors!

4. Driveway chalk or paint

My kids never get tired of drawing on the driveway, the sidewalk, the side of the house… but now that I think of it, it has been way too long since I brewed up a batch of sidewalk chalk paint! If just drawing pictures doesn’t engage them, you can always draw up a hopscotch or four-square board, or play “copy this letter”, or trace their outlines and let them colour in their own lifesized-selves.

Fun with sidewalk chalk paint (2 of 6)

5. Hot and cold hide-and-seek

Find five or ten small toys and hide them around the backyard. Give your seeker a basket or container to collect them and guide him or her by saying “getting warmer” when they get close or “getting cooler” when they get further away. Or, hide a small cache of something and draw up a treasure map where X marks the spot. We had a nanny who would make up a series of clues and hide them in sequential order all over the house, leading to a craft kit she would do with the boys – she was a terrific nanny!

While I don’t miss having to juggle nap times for the boys, I kinda wish we had more nap times for grownups built into the day!

What do you do to entertain an energetic big kid while the wee ones are napping?

Disclosure: I receive special perks as a part of my affiliation with the Fisher-Price Play Ambassador program with Mom Central Canada. The opinions in this blog are always my own.

In which the boys launch their movie careers at the Apple Store (alternate title: more free family fun this summer!)

This is a shameless but absolutely unsponsored plug for a great summer activity for kids aged 8 to 12. It was Beloved who noticed the ad for free kids’ camp on the Apple.ca website a few weeks ago. I think it’s a bit of a stretch to call it “camp” as the sessions are only 90 minutes over three days, but if you are looking for an amazing free (did I mention free?!) summer activity for your preteen kids, check this out!

At Apple Camp, kids ages 8-12 learn how to shoot their own footage, create an original song in GarageBand on an iPad, and put it all together in iMovie on a Mac. This free workshop, held at Apple Retail Stores, spans three days and ends with campers debuting their masterpieces at the Apple Camp Film Festival.

Tristan and Simon attended the one in the Rideau Centre this past week and they had a blast. I was highly impressed with both the idea and the execution. (Those Apple people are pretty clever – offer free and excellent workshops for kids, using Apple products natch, and require the parents to remain onsite throughout the workshop. But they were content to let me work away on my Blackberry and iPhone and stack of paperwork I’d brought along while the kids attended the camp.)

The kids learned to conceptualize and lay out a storyboard, and then use the Garage Band app to lay out a soundtrack. They were on their own to film up to a minute of footage overnight, and then they used iMovie to put it all together during the second session. (The third session, a “film festival” of all participants, is this Saturday, and we’re just skipping that part.)

They didn’t need to bring any equipment of their own, although they both brought their own iPods and used them to capture the raw footage. You don’t need any Apple devices to attend the workshop, but be prepared to covet one if you don’t have one. We had iMovie for the iPods already (annoyingly not the same as the iPad version Tristan had used with a friend to make movie trailers a few weeks ago) and although I have Garage Band for my Macbook it is apparently not the same Garage Band as the one for the iPad. (Which we had to download because it is a wicked cool app, so we were in for $5 by the time the dust settled.) That’s my only complaint about the whole process – the difference in apps across devices confused the heck out of me. But that’s an Apple problem, not a workshop problem.

The toughest part was actually coming up with the concept. (Isn’t it always?) The final footage bore little to no resemblance to the storyboards, and the soundtrack Simon created on day one was with an action movie in mind, although his final product was a commercial. (More about the product featured in his commercial in my next post – and stand by for an awesome giveaway!)

Curious? Here’s the final cut!

First up, Agent Meow: score, direction, inspiration, filming and editing done by Tristan with props (and apologies) to Henry Mancini:

And this is Simon’s masterpiece, featuring the Zoku shake and slushie maker from Mastermind Toys (watch for a blogger cameo!):

Not bad for a couple of hours, eh? I think they did a great job and I know they had a great time. In addition to the experience, they got free t-shirts, USB wrist bands and iron-on patches. For FREE! Mad props to the Apple store for this program.

It looks like they’re offering more workshops at the Rideau Centre and Bayshore Apple stores the last week of July – check with Apple.ca for a location and date near you!

The kiddie “bucket list” – 50 things kids should do before age 12, with an Ottawa-centric twist

Okay, this? Best parenting advice I’ve read in a long time, and very in line with my ever-strengthening philosophy of giving kids room to be kids. Thank you to my friend and longtime reader Kim for sharing this article in the weekend Globe and Mail: Bucket list for kids: 50 things to do before they’re 12

I love this, because I think each and every one of these is an excellent activity — and yet it makes me sad and kind of tired. Do we as parents really need to make an itemized checklist of experiences our kids must achieve? Meh, maybe the grey Ottawa skies and cold, damp temperatures are making me cantankerous. It actually sounds like a road map to a pretty great summer, if spring ever decides to return.

Here’s the official list, editorialized with my own local spin:

1. Climb a tree

2. Roll down a really big hill (Mooney’s Bay has a great one for this!)

3. Camp out in the wild (did you know there’s a campground on Prince of Wales just north of Hunt Club? Practically downtown!)

4. Build a den

5. Skim a stone (I recommend Britannia Beach for this one!)

6. Run around in the rain (or puddles, maybe?)

7. Fly a kite

8. Catch a fish with a net

9. Eat an apple straight from a tree (we love Kilmarnock and Cannamore orchards)

10. Play conkers

11. Throw some snow (can we wait until December for this one, please?)

12. Hunt for treasure on the beach

13. Make a mud pie

14. Dam a stream

15. Go sledging

16. Bury someone in the sand

17. Set up a snail race

18. Balance on a fallen tree

19. Swing on a rope swing (the rope swing is hands down the kid-favourite feature in our backyard)

20. Make a mud slide

21. Eat blackberries growing in the wild (there are – or were – wild raspberries growing along the boardwalk at the Chapman Mills Conservation Area)

22. Take a look inside a tree

23. Visit an island

24. Feel like you’re flying in the wind

25. Make a grass trumpet

26. Hunt for fossils and bones

27. Watch the sun wake up

28. Climb a huge hill

29. Get behind a waterfall (or maybe go caving?)

30. Feed a bird from your hand (bring some seed to the Lime Kiln Trail or Hogsback Falls for this one!)

31. Hunt for bugs

32. Find some frogspawn

33. Catch a butterfly in a net

34. Track wild animals

35. Discover what’s in a pond (Mud Lake is great for this!)

36. Call an owl

37. Check out the crazy creatures in a rock pool

38. Bring up a butterfly

39. Catch a crab

40. Go on a nature walk at night

41. Plant it, grow it, eat it

42. Go wild swimming

43. Go rafting

44. Light a fire without matches (um, no thanks)

45. Find your way with a map and a compass

46. Try bouldering

47. Cook on a campfire

48. Try abseiling

49. Find a geocache

50. Canoe down a river (although you might want to wait until they’re older than 3 and 5 yrs old!)

I figure the boys have a good half of the items crossed off, and I can tell you for sure I won’t be taking them abseiling any time soon – although the zip-line at a local aerial park is not out of question. What do you think? Is there anything on here a child of 12 can or cannot live without doing? Something you’d add to the list?

Snow day!

It’s a snow day here in Ottawa today. The buses have been cancelled and while the schools are still open, we’ve decided to let the boys stay home. I usually ship ’em off as even in the most treacherous conditions I think they’re better off for a few hours at school than at home, but by a fluke of scheduling both Beloved and I were home anyway, so we let them stay home for a treat.

Now that the kids are older, they’re better at entertaining themselves even on a long day at home. They like to play board games, and we’ve always got a craft of some sort on the go. And of course, there are the ubiquitous video games.

Snow days are such a break from routine that it’s fun to find something unique to do. Just a few days ago, I blogged a few more of my favourite indoor activities, including bead crafts and scavenger hunts. If you’re feeling like comfort food, how about baking up some rainbow cupcakes? Or maybe just whipping up a batch of home-made playdoh?

It’s pretty easy to pass the day with older kids, but sometimes not so much with babies, toddlers and preschoolers. Conveniently, my friends at Fisher-Price just shared this awesome new tool for inspiring playtime with your kids. I remember how hard it was coming up with ideas on how to play with a baby, especially when Tristan was a newborn, but there are dozens – maybe even hundreds – of great suggestions here on games to play with kids from newborn to school age.

From the simple idea of tummy talking for babies under 3 mos to the classic “red light, green light” for toddlers to storybook theatre for older kids, there are tonnes of great ideas. I like how each game also has information about which learning skill you’re stimulating and even some basic safety cautions. Wouldn’t this be a great tool for a young babysitter looking for ways to interact with kids as well? I really wish I’d had access to this when I was a new mom!

As I’m writing this post, I’m remembering how long those early days could seem, home with a baby who couldn’t entertain himself with Super Mario Bros or endless episodes of Max and Ruby. Isn’t it funny how while you’re in them, it seems like those days will never end and suddenly you realize that they’re long behind you?

If you could make one suggestion to help another parent pass a long winter day at home with the kids, what would it be?

(Disclosure: I am part of the Fisher-Price Play Panel and I receive special perks as part of my affiliation with this group. The opinions on this blog are my own.)

Winter break family fun ideas

With back to school starting so late this year, it seems like Christmas was ages ago. I don’t know about your kids, but at our house the kids are twitchy. Most of the gifts have been examined and played with, the family visits are past and the Christmas decorations stashed away for another year — and we still have a couple of days to kill savour together before the kids go back to school.

Are your kids getting squirrelly too? I thought I’d pull a few ideas from my archives to share, in case you missed them the first time around.

1. Digital camera scavenger hunt

You don’t need to use a camera for this – the low-tech version is just as fun – but the kids love the added element of the camera. Maybe they got one of these for Christmas? Make up a list of things outside like “blue car” or “tall tree” or “mail box” or whatever is in your neighbourhood, and then set the kids free to find the things as a team. It can be as short or long a list as you think they have the attention-span to complete, and by using the camera you don’t have the problem of what to do with the stuff they collect (a problem we’ve had with other scavenger hunts, and on a daily basis simply because my kids are natural scavengers!) Rainy day or freezing cold outside? Make it an indoor scavenger hunt with things like, “Daddy’s socks” and “blue shampoo bottle.”

257:365 Photographer-in-training

2. What’s in the bag?

You need a bag about the size of a shoe box for this. A fabric bag is best, like a shoe bag, and a recyclable shopping bag works well, too. You have to do a bit of advanced legwork for this one. Collect a bunch of stuff that has interesting shapes, sizes and textures. Dinky cars, a carrot, a bar of soap, a sock — whatever! One at a time, put an item in the bag and see if your child can guess what it is by feel alone. So simple, and surprisingly entertaining. We always end up laughing.

3. Beads

Don’t just buy bulk beads from the craft store, though; bring them to an actual bead store and let them pick four or five “special” beads from the bins, and then make up the difference with pony beads or other plain beads. You can also get a mixed bag of discards… my boys loved the ones that looked like crystals in a bag I thought was rather uninspiring. Letter beads are also a hit if you don’t mind forking over a bit more cash. And make sure you don’t choose the cord that is plastic and stretchy – it’s impossible to knot. Get nice thready cord.

When they finished making necklaces for everyone in the house and bracelets for Granny and Papa Lou and the rest of the extended family, all the Webkinz got new collars and we made enough bookmarks to last a year. You can also get little key rings to make backpack decorations. My kids LOVED the bead craft!

Beads


4. Treasure maps

This is similar to the scavenger hunt. One year our nanny made up a treasure hunt for each of the boys for their birthday gift, with ten rhyming clues leading them throughout the house. If I didn’t love her before this, when I read the work that had gone into her clues I knew she was terrific. Sample: “Under the place you sit to dine, you will find clue number 9!” The treasure at the end can be something small, because it’s the hunt that makes up the fun. If you’re feeling less wordy, you can just draw a treasure map with a nice big X that marks the spot.


5. Magazine cut-out books

I could spend hours doing this when I was a kid. Find some old magazines and catalogues destined for the blue box, and some construction paper. Cut pictures, words and letters out of the magazines to create a little story book. So simple, but creative and entertaining.

How are you planning to spend the last few days before the kids go back to school?

Best idea for Halloween neighbourhood fun ever!

I simply had to interrupt my series of post-Blissdom Canada posts to share this awesome Halloween fun idea with you!

Last night, I was loading the dishwasher and checking homework and doing laundry and preparing lunches and all the other fun things we do between dinnertime and bedtime when I heard a very faint knock on the door. I figured it was Beloved, who had been teaching late, and that one of the kids had slipped the lock on the door, so sent Lucas to open the door for him. When Lucas reported that nobody was there, I stuck my nose out, wondering if maybe the screen door had come loose again.

This was sitting on the porch:

Boo 1 (1 of 1)

Boo 2 (1 of 1)

A plastic cauldron filled with inexpensive Halloween treats and toys, dropped anonymously on the porch — how amazing is that?! The boys and I were tickled orange and black! Also in the cauldron were two pieces of paper. One had a big black BOO printed on it, and the other had a happy little Halloween poem and a set of instructions that said:

  1. Enjoy your treat.
  2. Place your BOO on your front door.
  3. Now you have 24 hours to copy this twice, make 2 treats, copy 2 BOOs and secretly deliver them to 2 neighbours who do not have a BOO on their front door.
  4. Then watch how far this spreads by Halloween.

Is that not AWESOME? I’d never heard of anything like this, but Twitter seemed to have heard of this and called it “ghosting” and “BOOing” — apparently it’s a thing now. And don’t you want to totally start it in your neighbourhood? Well, you should! And to help, I’ve scanned the original poem and BOO sign and saved them as PDFs in dropbox, so you can print out your own copies and start the BOO flowing in your neighbourhood!

What fun! Now I’m off to BOO two of my neighbours, too!

Friday Family Fun: Movie night! And, a giveaway!

Here’s a quick and simple idea for Friday Family Fun: pop some popcorn, find some sugary snacks and pop a movie into the player of your choice. Such a simple pleasure, and the boys LOVE it when we do this. It’s especially delicious if you’re willing to let them stay up half an hour or an hour past their bedtime on movie night. Is there anything better than snuggling under a blanket, sharing a popcorn bowl and watching a movie together after a busy day of summer fun?

To give you something new to share on your next family movie night, I’m happy to offer brand-new-in-the-wrapper copies of Diary of a Wimpy Kid and the sequel, Diary of a Wimpy Kid: Roderick Rules, thanks to our friends at GCI Group.

Want to win one? Here’s how!

  1. To enter, leave a comment on this post suggesting a great movie choice for a family movie night.
  2. One entry per person.
  3. The prize is a set of two DVDs, Diary of a Wimpy Kid and Diary of a Wimpy Kid: Roderick Rules.
  4. Contest opens today, August 19 and runs through Tuesday August 23, 2011 at noon EDT.
  5. One winner will be chosen via random.org and announced on this post by Wednesday, August 24.
  6. Winners must reside in Canada or the USA. You must be willing to share your mailing address with me to receive the prize
  7. .

Good luck!

Edited to add:
It pays to be quick! Congratulations to commenter #1, Steve Wynn! Enjoy the movies!! 🙂

Friday Family Fun: Back yard camp out!

I love the idea of camping. Fresh air, change of scenery, the great outdoors, campfires and sleeping under the stars. Unfortunately, I’m a bit of a princess and also love nine hours of sleep. In a bed, not on the ground. And not within arm’s reach of my entire family.

That’s why I really love the idea of a backyard camp out — the less diva-ish members of the family (that is, everybody except me!) can sleep in a tent, but there’s no 500 meter hike to the nasty outdoor loo in the middle of the night, and if it pours the farthest you have to run is across the patio to safety. Also? No bears.

Campout 2

Yesterday was just about the most perfect day imaginable for a camp out. Warm sunny day, cool dry night. We had a camp-ish supper of sausages, salads, and (I swear, I didn’t plan it maliciously!) beans. Then we stoked up the fire pit and had s’mores for dessert. If you don’t have a fire pit in your back yard, you can always do these on the BBQ, too!

Campout 1

The kids couldn’t wait to get their jammies on, and Beloved and I laughed at the steady stream of “mandatory” supplies that migrated into the tent: favourite blankies and pillows and stuffies and comic books and more blankets and more books. One handheld electronic game was intercepted and denied. The kids couldn’t wait to get to bed – should have thought of this years ago!

Campout 3

I listened with half an ear most of the night, expecting to hear the patio door sliding open and little feet seeking softer beds, but they all made it until dawn in the tent. Lucky for me, I was already awake — Willie couldn’t find anyone else to torment at 5 am and had been chasing dust motes across my bed for more than half an hour when the kids tumbled in, boisterous and happy after their night in the tent.

And the best part of backyard camping? You don’t need to re-stoke the fire to have that first, and very necessary, cup of coffee in the morning!