In which she shares her secret passion – for tarot cards!

How have you been faring during these days of pandemic lockdown, friends? We’ve been very lucky in that we’ve had the means and ability to hunker down and wait things out, and after seven weeks, the fear is no longer as pervasive as it was the first little while.

Being home and pulled from our usual routines has left me with a lot of unexpected time on my hands. I might have used that time and excess energy for domestic chores (okay, probably not that), or honing my photography skills, or even blogging. In fact, what I have been doing is dedicating several hours most days to my latest obsession: tarot cards.

tarot cards

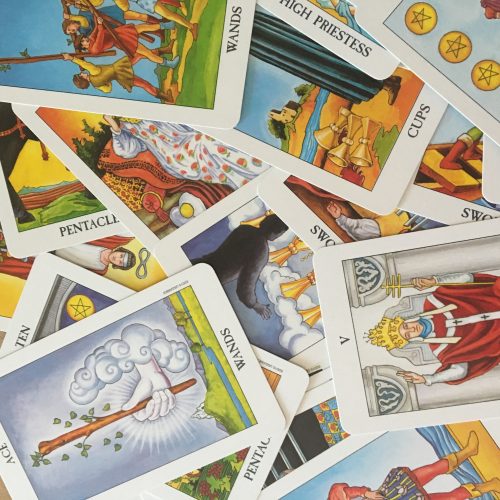
You didn’t see that one coming, did you? I certainly didn’t. I’d never held a tarot deck before I bought one for myself on a whim, and never had a reading done. I knew of the cards, and had a vague understanding that they were something like a fortune-telling parlour trick. What I didn’t realize is that what they are is in fact that elusive manual to life that I’ve been searching for all these years, a road map to better understanding of myself, my relationships, and the world around me. No, really! Hang on and let me explain.

Have you ever done one of those tests that help you understand your personality type? There are workplace ones with colours, and of course the Myers-Briggs personality types. There are zillions of online quizzes to find out “how employable are you?” or “what’s your life purpose?” or “where will you find your soulmate?” We can’t resist these types of assessments because as humans we seek meaning – some of us more than others. I’ve always been a seeker, looking for order in the chaos and meaning in the randomness of human existence. I think that’s why I was so instantly and obsessively drawn to tarot cards. I see in them the universality of human experience and more importantly, where I fit in to the great cosmic puzzle.

There’s a fun quote in Good Omens about how you can’t see London when you’re in Trafalgar Square, a much more fun interpretation of not being able to see the forest for the trees. The tarot cards use archetypes, the languages of symbols and numbers and colours, and simple illustrations of the wide spectrum of human experience to give us that wide-angle perspective so we CAN see London, as well as Trafalgar Square, and maybe even most of England, too.

Leaving the existential angsty bits behind, what does one actually DO with tarot cards? I use them for mindfulness, for personal insight, and to get in touch with my intuitive inner voice. I do NOT use them for fortune telling. Over the last little while I’ve come to see tarot cards as a powerful and useful tool, but I do not believe they can predict the future. I think they can help us understand ourselves better, our motivations and behaviours and blind spots. I think they can help us understand those around us, too – colleagues, spouses, kids, and friends, in the same way that knowing your colleague may be a “yellow” when it comes to problem solving and communicating, but you are a firm “blue” and you need to find a way to overcome those differences to work together. Tarot gives us insight into the things that make us human, and therefore helps us better connect to other humans, and to ourselves.

When I found out back in 2010 or so that I’m an ENFP in the MBTI, it rocked my world. I literally titled my blog post talking about it “This explains everything!” Knowing my Myers-Briggs personality type gave me a fundamental understanding of my behaviours, motivations and ways of interacting with the world. It truly changed my understanding of myself. Almost instantly with tarot, I felt the same sort of light bulb moment of clarity. And when I started getting deeper into the tarot, I felt like I did when I launched the blog 15 years ago: “this is crazy, my friends and family are never going to understand this weird behaviour, but this is something I must, absolutely must, do.”

One unexpected gift from the tarot has been mindfulness. Each day I draw a card and think about how the energy of that card has or might manifest itself in my day. The result of this has been a few quiet moments when I ask myself a question we almost never ask, but I think we really should: what did today mean? How often do we pause to think about what happened in a day, what went well and maybe not so well, and how we might do better the next day? Wasn’t it Socrates who said that the unexamined life is not worth living? These tiny moments of mindfulness are to me the equivalent of a gratitude journal, giving the seeker in me a chance to take that step back and breathe and take a look at that bigger picture.

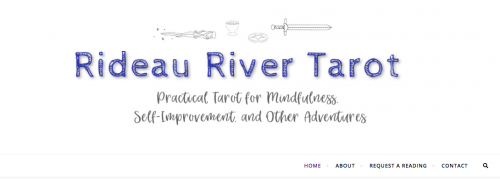
I’m sure most people who have held a tarot deck haven’t become instantly obsessed, and many of my friends have talked about digging their deck out of storage as they listened to me rave about my new passion. Rather than indulging in a passing curiousity, I’ve gone all-in on my tarot passion. First I launched an Instagram account to journal the card of the day (and let me tell you, that felt an awful lot like the Project 365 photo-a-day whim that culminated in me being a professional photographer!) And when that wasn’t enough, I created a blog and website about learning tarot, too. You guys, I’m not kidding: o-b-s-e-s-s-e-d. Not wanting to pester my friends too much peddling my readings, I started doing free readings on a tarot site and quickly racked up more than 25 readings with an average rating of 4.7/5 stars. So now I offer those on my website too. It’s called Rideau River Tarot, inspired by the river that I see every single day as flows around the island we live on here, but also because water is the element of tarot linked to emotion and intuition, and because curtains are an important symbol in tarot and Rideau means curtain. Mystical and practical, which is more or less how I’m approaching tarot. And Tristan drew the tarot suit icons for my blog header!

Rideau River Tarot blog

Sort of crazy, right? But it feels so right, like when I started out on my bloggy journey all those years ago, or the Project 365 photo journey. I only wish I’d discovered tarot earlier in the game – but at least I’ve had an excess of time on my hands during our pandemic life pause to fully indulge my new passion. I’ve been reading books and listening to podcasts, doing research and of course playing with the cards. I’ve written blog posts about books and resources for learning, about MBTI and tarot, and about ways you can use tarot cards that aren’t divination, including as creative writing prompts, for mindfulness, and even to help you generate random encounters and characters for your D&D adventure. I’ve got SO MANY ideas! And one of these days, I’d like to start offering lessons and workshops, something I found surprisingly lacking here in Ottawa.

After months of debating whether and when I should come out with my quiet obsession, I’m here to share it with you. So, what do you think? Are you already someone who enjoys using tarot cards? Are you interested in learning more about tarot? Do you have any tarot resources to share? Do you think I’ve lost the plot entirely? 😉 It’s okay if you do. People thought I was crazy with the silly blog thing a decade and a half ago, when blogs were solely for tech geeks and lovesick 14 year old girls. I have this feeling that tarot is the next yoga, about to move from fringe to mainstream culture, and I am here for that.

The one with the radioactive sea glass

Longtime readers of the blog know that we’ve been obsessed with sea glass for many, many years. I was first introduced to the idea when we visited Bar Harbor, way back when we were a family of four. My bloggy friend Phantom Scribbler introduced me to collecting tiny pebble-sized bits of glass as we wandered along the sea shore.

By sheer chance, our next major family vacation in 2010 brought us to a beach near Lunenberg, Nova Scotia that was so rich in sea glass that we filled our pockets to overflowing each time the tide went out, and an addiction was born.

Four of the last five years, we’ve scoured the beaches of Prince Edward Island, and especially the coastline near Souris, picking bits of joy out of the sand. I’ve made sea glass jewellery, key chains, mobiles and even a sea glass lantern, and I’m sure we have more than five kilos of it stashed in various containers around the house. By some weird fluke, though, this is the year that we found our most unusual and precious pieces.

The first was this purple coil. Purple is a rare colour for sea glass, and this crazy curl is quite unusual. In fact, we couldn’t help but enter it into the “best shard” competition at the Mermaid’s Tears sea glass festival that happened to be taking place in Souris when we were there last month. It took honourable mention, and the judge said its only drawback was that it was a relatively young piece and didn’t have much pitting or other signs of aging. We wonder what it could have been?

sea glass

It wasn’t until we got home, though, that we realized the other treasure we’d found. Beloved was scanning through our haul with a black light flashlight and one piece glowed unmistakably: we’d found not one but TWO elusive pieces of radioactive sea glass, also known as UV glass, Vaseline glass or uranium glass, because it is in fact made with trace amounts of uranium. Yes, THAT uranium, the one they use to make nuclear bombs! It’s not overtly visible to the naked eye, and we had no idea these were a pieces destined for my ‘favourites’ jar until it glowed smartly and obviously when Beloved skimmed the black light over them.

Uranium glass, or UV glass

Apparently, uranium used to be a commonly used ingredient back in the day to add certain colours to glass tableware. In doing a little research, we found out that the flourescence of UV glass is totally unrelated its radioactivity, which is actually measurable with a Geiger counter. However, since only small amounts of uranium were used during the manufacture of the glass, the amount of radioactivity in uranium glass is not considered harmful.

Isn’t it amazing how it looks completely unremarkable under normal light (left photo), but glows neon bright under the black light? Note to self, bring black light flashlight to PEI next vacation!!

comparison between UV uranium glass and sea glass

From a long but fascinating delve into the science and art behind Vaseline glass: “Regardless of who did what first, we know that [uranium] itself was identified in 1789, when German chemist Martin Heinrich Klaproth named it after our solar system’s most recently discovered planet. Back then, uranium was seen as just one more mineral to color clear silicon dioxide, the main constituent in the sand glass is made from. Chemists like Klaproth knew that cadmium turned glass yellow, cobalt made it blue, manganese produced violet shades, and certain compounds of gold went red when heated, blown, and cooled.”

So now we’ve added to our collection a small fragment of red (one tiny fragment in boxes and boxes of sea glass!), a lovely frosty marble, a bit of milk glass, quite a bit of the more rare cobalt and purple glass, and now this fun discovery. Isn’t that the coolest thing? We just love wandering the seaside like magpies, looking for shiny bits, and treasures like these make the search that much more fun — and addictive!

Have you collected enough to have a favourite shard of sea glass or a fun story to tell about how you found some? And now for the really hard question: WHAT should I do with it???

In which Lucas gets his Hogwarts acceptance letter

This has definitely been the year of all things Harry Potter in our lives. I’ve been reading the series to Lucas for more than a year (we’re about half way through the Half Blood Prince), and our trip to England last summer was pretty much based on cramming in as many Harry Potter references as we could manage, including a visit to the Harry Potter experience at the Warner Bros studio.

And since Lucas turned 11 years old this week, it seemed only fitting that he receive his official letter of acceptance from Hogwarts. It was surprisingly easy to make our own custom, personalized acceptance letter to the famous school of witchcraft and wizardry!

The Harry Potter wiki gave me the wording I needed. I found the Hogwarts logo on the wiki and used it for the header.

Personalized Hogwarts acceptance letter

It was short and simple, so I decided to add the second page with required list of supplies and books as well. This time I used the Hogwarts crest as a watermark. The wiki even had the signatures for Professor McGonagall and the Chief Attendant of Witchcraft Provisions. Details make the illusion hold together!

Home made Hogwarts acceptance letter

I picked up a small pack of parchment-like paper at the stationery store, but you could easily print it on regular, thick paper and use a wet teabag to give it a little colour and character or even burn the edges a bit. The fonts, in case you were wondering, are Luminari for the Hogwarts header text and Copperplate Gothic Light for the body text.

The question of how to deliver it was a little bit trickier. Dangling in the fireplace seemed like a fun but potentially messy option. When I started thinking about owl post, my first inspiration was borrowing an owl stuffie from friends, and then I realized that all three boys are collectors of the Funko POP figures, and a plan was born.

A little fishing line, a bit of shiny ribbon and the chandelier helped our new Hedwig POP figure deliver the scroll tied to her ankle containing the letter from Dumbledore.

Hedwig delivering custom Hogwarts acceptance letter

She’s a little small. In truth, she looks more like Pigwigeon than Hedwig. But, she did an excellent job delivering the letter, right at the beginning of Lucas’s birthday party. His friends noticed her before he did!

Lucas gets his Hogwarts letter from Dumbledore

Hedwig delivering custom Hogwarts acceptance letter

I love the look on his friends’ faces!

This was an easy and fun gift for an avid Harry Potter fan. I only wish I’d thought of it three boys ago! (And yes, I know that strictly speaking, the Hogwarts letter of acceptance doesn’t need to be delivered on one’s 11th birthday — but it was fun that we could make it work!)

If you have any questions about how we pulled this together, or suggestions that will help someone else do a better job, please don’t hesitate to comment!

A non-tech mom’s guide to Google Cardboard and VR (Part two : Mind = blown)

Last we saw our heroine, she had braved the wilds of Google and Amazon, wandered the badlands of “available to US residents only”, faced down the demons of bleeding-edge technology and come out victorious brandishing a View-Master VR viewer for Google Cardboard. (Read part one of this post here.)

I’d been reading about Coardboard and smartphone VR and was intrigued by it. The boys knew about VR technology like Oculus Rift mostly by watching PewDiePie and other YouTubers. And yet, none of us were prepared for how very cool the virtual reality experience would be. You’re talking about a girl who doesn’t even like 3-D movies!

Using the View-Master VR viewer couldn’t be more easy. Download the Google Cardboard app to your smartphone. Open the View-Master box. Use the app to take a photo of the QR code on the View-Master to tell the app which kind of viewer you are using. Slip the phone into the viewer and hold the viewer up to your face — and be prepared to be blown away. Seriously, it’s the coolest thing I’ve never imagined.

With the viewer, you can look up, down, behind you, to the side – it’s as if you’re standing inside a photo. And then you realize you can interact with the photo by moving around. On the “Urban Hike” part of the Google Cardboard app, you find yourself on a street in Paris near the Eiffel Tower, and as you turn your head, the scene shifts in real time based on your motion and you can click to follow a Google-Maps pointer to walk down the street.

We took turns passing it from person to person, marveling and gasping and laughing at each new reaction. The only thing more fun than your first experience with Google Cardboard is watching somebody else’s reaction to their first Google Cardboard experience. It dazzled my seven year old, my teens and my 71 year old father in equal measure.

ViewMaster with Google Cardboard

With just your Cardboard device and the basic app, you’re set up for hours of entertainment. As soon as you wrap your head around the technology, though, you start to wonder what else it can do. You want more more MOAR content.

And that’s when I fell down the rabbit hole. The two-and-a-half hours after I asked myself “hey, I wonder what else this thing can do?” were a mixed bag of delight and exasperation. Didn’t I hear something about all YouTube videos being enabled for Cardboard? After all, YouTube and Cardboard are both owned by Google. I spent a ridiculous amount of time trying to figure out where exactly I was supposed to see the (clearly invisible) Google Cardboard icon on a video’s watch page before I figured out that I needed to be in the YouTube app, which I promptly downloaded. It took another exasperating interval before I realized that I’d only find it in the YouTube app for an Android (also parented by Google) device, not my iPhone. And when not even Tristan’s HTC Android phone would offer up the icon (not to mention the miserable learning curve of figuring out his user interface, such a child of Apple am I) we learned that his phone does not have a gyroscope and therefore does not work with Cardboard, and Google simplifies this by simply not making the app visible to him in the Google Play store. Many, many virtual heads were banged on virtual desks in this fruitless pursuit. We finally did get it working with Beloved’s Samsung S4 mini, but after the hours of frustration, I found the results rather lackluster. I’m sure with a newer Android phone with a bigger screen, the results will be breathtaking. I’ll wait for them to roll out an iOS version. There are a growing list of other apps that work on iOS, though – this list on Reddit seems robust.

So what exactly do you do with Google Cardboard on an iPhone, beyond playing with the Cardboard app contents? Given that this technology is only about a year old, there are already all sorts of cool things you can do. There are VR experiences, like attending a Paul McCartney concert or jumping out of a plane. You can play games, watch movies, ride virtual roller-coasters, or visit photospheres (360 degree panoramas) of exotic places — like the surface of Mars! With an Android phone, you can even take your own photospheres – I’m looking forward to that being available on iOS, too.

I must admit, I did get a little cranky about having to download a new app for each thing I wanted to try. I did download the Star Wars app (of course I did) and it has several Cardboard mini-adventures in it, but they are huge and space is already at a premium on my photo-stuffed iPhone. The app does have a nice section where you can manage the data being clogged up by the app, so I will keep this one. (Bonus Star Wars content: countdown to Episode VIII!)

My favourite discovery by far has been the Google Street View app. Enter any place on earth that Google has mapped with their street view camera and go for a virtual walk. With literally the whole world at their fingertips, my boys were most entertained by “walking” down our street from our house to our mailbox – go figure. Imagine, though – check out the street view of a hotel before you visit it, revisit your favourite vacation spots, see if the house where you grew up still looks the same.

I remember the very first time I used the Internet, probably back in 1992 or so, and I was paralyzed by the question of “where do you want to go?” When the answer is both anywhere and everywhere, it’s tough to narrow the answer down to just one place to go first! The funny thing is that I have the same feeling with Google Cardboard’s VR that I had the first time I surfed the Internet – that sense of wonder mixed with the feeling that you’re standing at the beginning of something so full of potential that you just can’t wrap your brain around it. Accessible VR for everyone? Mind = blown.

So, what do you think? Are you intrigued? Or am I preaching to the choir? Have you already taken a Cardboard viewer for a spin? Feel free to share any great experiences or apps you’ve found. (And if you’re interested in getting the View-Master VR viewer, they’re starting to roll them out in Canada. I found them online at Best Buy and Toys R Us for less than $30.)

If you do pick one up, or have a different Cardboard viewer, I’d love to hear your thoughts!

A non-tech mom’s guide to Google Cardboard (Part one : Get Cardboard)

Through October and November this year, I became increasingly intrigued by Google’s efforts to make virtual reality (VR) accessible to the masses through its Google Cardboard device. “Experience virtual reality in a simple, fun, and inexpensive way with Google Cardboard.” My curiousity was originally piqued by the ways we might harness the nascent technology in the work I do for Agriculture Canada in social media, but the more I read, the more fascinated I became with the idea of VR for anyone.

I understood the concept loosely. Assemble the viewer by folding up pre-cut cardboard and attaching a few lenses and widgets, download an app and insert your smartphone into the device. Use the viewer to experience immersive 3-D “virtual reality” on your smartphone. Pretty cool!

For a couple of weeks, I poked around various sites considering my options to acquire a cardboard viewer. They’re so inexpensive to manufacture that all home subscribers to the New York Times got one with their newspaper in early November. If you’re a US resident, you can buy one for less than $20, but they’re tougher to find from Canadian retailers, and when you do find them, of course they are more expensive. I was temporarily seduced by the idea of making one with the boys: “To build your own viewer all you need are a few everyday items you can find in your garage, online, or at your local hardware store: cardboard, lenses, magnets, velcro and a rubber band.”

Google cardboard

Hey, that doesn’t look so bad, right? I could totally do that. Ha! All my delusions of craftiness came to a crashing halt when I opened this, one of seven pages of design schema in the DIY download:

Google cardboard schema

Right. That’s absolutely not going to happen. With middle age comes the grace of acknowledging one’s own limitations, and one look at the fiddly details made it crystal clear that Google Cardboard as a DIY project could only end in misery.

So, with my options reduced to acquiring rather than making a viewer, I poked around various sites trying to decide whether I was invested enough in the concept to fork over upwards of $50 for a cardboard viewer and grumbling about how so many others seemed to be able to get one for free. Cost aside, choosing an appropriate viewer is incredibly intimidating if you only have the vaguest understanding of the technology. There’s a V1 from 2014 and a V2 from mid-2015. Some have NFC chips, some do not. Google endorses a handful of viewers, but most of the ones I clicked on started at the $25 US range, with an additional $5 to $10 for shipping and the dreadful exchange rate, pushing it outside of how far I was willing to go just to satisfy my own curiousity.

My head nearly exploded in mid-December when the Google store offered FREE Star Wars: The Force Awakens viewers – to US residents only. The rather robotic Google Store support person I harangued via help chat was cheerfully immune to my pleas and offers to pay for shipping. “Do not worry, Miss, there will be many enticing and exciting options available to Canadians in the very near future!”

Discouraged but stubborn, I was surfing cardboard-related reviews to parse what I could get for what price when something tweaked my attention. Wait, what? A View-Master cardboard viewer? You mean, like a Fisher-Price View-Master? The one every kid of my generation and most kids since played with? THAT View-Master?

20110318-DSC_0249

Turns out the View-Master got all fancy and 21st century when I wasn’t looking! Check out the 2015 View-Master VR, redesigned to work as a Google Cardboard viewer:

Mattel View-Master VR viewer

How cool is that? Intrigued, I did a little research and found they were very highly recommended as an inexpensive but sturdy Cardboard viewer fully endorsed by Google, but could not find them for sale in Canada anywhere near the $20 price range they were selling for on Amazon.com. I reached out to my old contacts at Mattel, where they are just getting ready to widely distribute the View-Master VR viewer to Canadian stores and long story short, one arrived on the porch a scant 24 hours later, just in time to be put directly under the tree for Christmas.

You’ll have to check out part two in this two-part series to find out how we liked the Google Cardboard experience with our new View-Master VR viewer but here’s a hint: it was worth every arduous minute of research, contemplation and dithering, and was easily the most intriguing gift under the tree this year!

Band Aid 30

The original Band Aid song Do They Know It’s Christmas came out in December 1984. I was fifteen years old, and I adored that song and video. I bought it as a 45 rpm single (kids, go ask your parents what that is) and years later I bought it as digital file. It’s on every Christmas mix I’ve ever made, from mixed tapes on cassette to iTunes playlists.

So it’s little surprise that I would love this: Band Aid 30, a remix organized by orginal Band Aid founders Bob Geldolf and Midge Ure to raise funds toward the Ebola crisis in Africa.

I knew every single participant back in the original Band Aid, back in 1984. It made me feel more than a little old to watch the new one and scratch my head while peering at the unfamiliar faces. Oh wait! There’s Seal, I know him! And Sinead O’Connor. And holy crap, Bono is showing his age, isn’t he? Ooo and, um, that guy from Coldplay. If you’re peering at the screen and puzzling about who all these babies with microphones are, here is the line-by-line list of who sings what, along with the updated lyrics:

‘It’s Christmas time, and there’s no need to be afraid’ – One Direction
‘At Christmas time, we let in light and we banish shade’ – Ed Sheeran
‘And in our world of plenty, we can spread a smile of joy’ – Rita Ora
‘Throw your arms around the world, at Christmas time’ –Sam Smith
‘But say a prayer; Pray for the other ones’ –Paloma Faith
‘At Christmas time it’s hard, but when you’re having fun’ –Emeli Sande
‘There’s a world outside your window, and it’s a world of dread and fear’ –Guy Garvey (Elbow)
‘Where a kiss of love can kill you’ – Dan Smith (Bastille)
‘And there’s death in every tear’ – Angélique Kidjo
‘And the Christmas bells that ring there, are the clanging chimes of doom’ – Chris Martin (Coldplay)
‘Well tonight we’re reaching out and touching you’ – Bono (U2)
‘Bring peace and joy this Christmas to West Africa’ – Seal
‘A song of hope, when there’s no hope tonight’ – Ellie Goulding
‘Why is to comfort to be feared’ – Sinead O’Connor
‘Why is to touch to be scared’ – Sinead O’Connor
‘How can they know it’s Christmas time at all?’ Bono (U2)
‘Here’s to you’ – All
‘Raise a glass for everyone’ – Olly Murs
‘And Here’s to them’ – All
‘And all their years to come’ – Sam Smith
‘Can they know it’s Christmas time at all?’ – Rita Ora
Feed the world, let them know it’s Christmas time again – All
Feel the world, let them know it’s Christmas time again – All
Heal the world, let them know it’s Christmas time again – All
(source)

Regardless, I will definitely buy this single and add it to my Christmas 2014 mixed tape playlist.

What do you think of the remix? And more importantly, what other songs do I need to add to the Christmas 2014 playlist?

Tips from TELUS for Safer Internet Day

The older the boys get, the more concerned I am about their online safety. The ‘net can be treacherous for savvy adults, let alone kids – will they click on a phishing link and download some malware? Will they be exposed to inappropriate content? Will they be bullied or worse?

And yet, I’d be hypocritical to restrict their access too broadly. I truly believe that the key to keeping kids safe online is constant vigilance on the part of the parent, and open lines of communication. By constant vigilance, I don’t mean spending hours peering over their shoulders – my eyes glaze over at the idea of more than 10 minutes of Minecraft at a time. But there are no closed doors in our house, online or in real life. They know I can and will read all of their e-mails, texts and internet searches. We talk often about the perils of overdisclosure, and how to comport one’s self as a good online citizen. And they know they can always, always come to me if they see something that makes them uncomfortable.

chromebook kitchen

It’s because I am so interested in the topic of online safety for kids that when TELUS sent me a list of tips for parents, I wanted to share it with you. (This is NOT a sponsored post, I am sharing because I think this is important, valuable information.)

Here’s what TELUS said:

Did you know that Tuesday, February 11, 2014 is Safer Internet Day? We will be hosting a live web discussion and Q&A with our partner @MediaSmarts about measures we can take to keep our kids safer online. MediaSmarts has recently revealed the latest findings on what Young Canadians in a Wired World are doing online, which will act as the basis for our discussion. You’ll also have an opportunity to ask the experts any questions you may have on this subject to find out what more you can be doing for you and your family to stay safe on the Internet.

Feel free to invite all your followers to join us too and follow the conversation on @TELUS #TELUSWISE.

You can follow the conversation live on Twitter, or you can dial in to a webinar for more info. Here’s the logistics:

  • To be part of the discussion, you must call into the conference bridge as well as log in to WebEx.
  • If this is your first time using Web Ex, please ensure you log in 10 minutes early as it will take a few minutes for Web Ex to set up on your computer.
  • Go to https://telus.webex.com/telus/j.php?J=925419345
  • Enter the event password: WISE123
  • Click “Join Now”.
  • To join the audio portion of this call, dial 1-855-353-9183 and enter passcode 67758#.

If you can’t tune in to the webinar, here’s ten tips from TELUS on keeping your family safe online:

1. Google yourself – Put a Google Alert on your name so you can track your digital footprint.
2. Set strong passwords – Prevent hackers from getting into your computer, smartphone or online profiles.
3. Turn off geo-tagging – Avoid location details being attached to things like photos when taken on a smartphone.
4. Install security software – Some smartphones come with software to locate your phone when lost; take advantage of these free services.
5. Configure your profile settings – Ensure privacy is set on all your online profiles.
6. Keep your browser updated – and clear your browser history and cache at least once a month.
7. Be cautious using free Wi-Fi – Make sure your device is secure so hackers can access personal information.
8. Choose new aps carefully – Only use your device’s App Store to ensure downloads are safe and virus free.
9. Beware of risks using Bluetooth technology – Only enable connections with trusted devices.
10. Delete personal data when recycling old devices – Use the factory reset to properly remove things like photos, passwords and files.

It’s my middle child who is pushing me out of my comfort zone with social media. I forbade his Twitter account but allowed Instagram. Now he wants to post Minecraft screen-cap movies to YouTube.

I do this for a living and I’m still not ready for this. How are the rest of you managing it?

Smart phone tip: Put your contact info on your iPhone’s lock screen

The phone on my desk at work rang and I could hear the smile in Beloved’s face as we spoke.

“Are you missing something?” he asked. I glanced around my cubicle, checking for my purse, my lunch, or anything else I had probably left on the kitchen counter.

“Um, no?” I said, with not much conviction.

“Have you seen your iPhone lately?” I was perplexed. I knew I hadn’t left it on the counter at home, because I’d used it at Starbucks on my coffee break. Before I could puzzle out the mystery, Beloved filled in the gaps. “The security desk in your building just called. Someone turned in your iPhone to them.”

Oh crap – and then I remembered. I had taken it out of my back pocket in the bathroom so it didn’t go for a swim when I dropped my drawers, put it on the little shelf… and forgotten about it. Not the first time I’d done that, either. And the kind person who picked it up was able to find me because I have my contact info on the lock screen, like this:

Untitled

Brilliant, right? I can’t remember where I even got the idea, but in the year since I have had the info there, my wandering iPhone has come back to me via the kindness of two strangers and one amused co-worker.

To make your own version, just choose a photo without too much competing detail and an app that lets you add text to a photo. Save that to your iPhone’s photo library, then set that photo as your iPhone’s lock screen. Even if you have a passcode lock on your phone (which you really should!) anyone who turns it on can see your contact info without the having to enter the passcode.

An easier still solution would probably be to stop leaving your iPhone behind on any old convenient flat surface. You think maybe there’s an app for that?

Five things I learned about my iPhone 4S in my quest to improve battery performance

I love my iPhone. I love it madly, maybe even obsessively. I carry it with me everywhere and sleep with it charging on my bedside table. It’s half talisman and half umbilical cord. Like all great love affairs, though, ours is a tumultuous one. As passionately as I love it, I despise it when it misbehaves. The recent upgrade to iOS7 has been a lover’s spat of epic proportions. Suddenly my endlessly loyal companion was running out of passion (erm, battery juice) before noon, when I regularly get at least a day’s performance out of a single charge.

I clearly wasn’t the only one having problems with iPhone battery life after iOS7 upgrades (1.5M search returns and counting on iOS7 battery drain!), and I found these articles in particular from the Huffington Post and Mashable helpful in identifying and rectifying the worst battery-draining culprits. I’ve never allowed e-mails (or most notifications, for that matter) to push to my phone, but I did find out that apps were running in the background and draining a lot of juice – and data. It took me nearly a week of tinkering, but I’ve got it back to a point where I’m actually getting improved battery performance over where I was before the upgrade to iOS7.

In the process, I learned a few tips and tricks I thought worthy of sharing beyond the preservation of battery power. Maybe you knew all these things already, but they were news to me.

So then, five things I learned about my iPhone this week:

1. How to close apps running in the background

Did you know apps don’t close when you hit the home button (the circular button with the square on it at the bottom of your screen)? You just shove them into the background, and some of them keep running and sucking up power and resources. Double-click on the home button and you’ll be able to see all apps that are currently running. Flick the little screen cap above the icon upwards to close the app. I am now in the habit of going in and closing all running apps a few times a day. (I believe this only applies to iOS7 and not prior OSes.)

photo 4

2. You can set a delay on the passlock screen

It’s a good idea to have a lock on your phone, especially if it has sensitive contact info and photos on it. However, it always drove me nuts that the the second you click the phone into sleep mode, you have to re-enter the pass code to unlock the phone. Especially when you’re trying to snap photos, this can be tedious and time consuming. I thought I had searched every directory for an option to add a delay to this but could never find it — until now! Voila, delayed passcode! Look for this option under Settings > General > Passcode Lock.

photo 2

3. Apps running in the background may be updating over wi-fi or cellular connection

I was doubly annoyed to find out that not only was I burning through battery power faster than my five-year-old burns through goldfish crackers, but that I had smashed through my data cap by 20% only half way through the billing month. Turns out my iPhone was updating itself willy-nilly for apps that I didn’t even know were running. (See point 1 above – closing an app does not mean it’s not still running.) I turned THAT tap off in a hurry. Look for it under Settings > General > Background App Refresh.

4. Constantly seeking wi-fi and Bluetooth connections is a huge battery drain
You know that little window that pops up to tell you about nearby wi-fi connections? Your iPhone is always looking for connections (kind of like a randy teenager) and that’s a huge battery drain. My pedometer “talks” to my iPhone via bluetooth, which is very cool and I will write a separate post about that one of these days, but it also sucks battery life as the iPhone looks for Bluetooth devices to connect with. (I think this was one of the things that I turned off that made the biggest improvement in battery life, because I forgot to turn it back off after updating my Fitbit stats yesterday and battery life plummeted again.) And I don’t know about you, but most of the open wi-fi connections I find are cantankerous and I can’t usually get my mail to download over them anyway. I’m looking at you and your “free” wi-fi, Starbucks! Anyway, if you turn off the option to always seek new wi-fi connections, your iPhone will still connect automatically to recognized wi-fi networks, and you can seek them manually via the Settings function. Bonus: no annoying pop-up screens full of locked networks you can’t access anyway.

5. You can see how much data each app has gobbled up – and tell some apps never to connect on a cellular network
Wondering which apps are data hogs? Go to Settings > Cellular and scroll down to the bottom. You can see how much data each app is gobbling up here and turn connectivity over cellular off for the worst offenders. I like Facebook but I was gobsmacked to see how much data it consumed this month – probably almost entirely because I’d check it early in the day and close the app without turning it off so it would just keep updating all day long even though I wasn’t looking at it. Sigh.

photo 3

Oh, and here’s a bonus tip for you. I have had the old “nostalgia” ring tone on my iPhone pretty much since the day I got it. I have a newfound love for Macklemore, though, and decided that I really needed the opening riff from “Thrift Shop” as my ring tone. You can buy a Thrift Shop ring tone, but it’s not the funky sax riff with the “whut whut”s in it. I downloaded an app called Ringtone Designer that lets you take a 30 second snippet from any song in your iTunes library into a ring tone. Hey, if I can figure it out, anyone can. Not just any custom ring tone, but a hip hop one. I am cool now, right? RIGHT?!

I hope you found these useful! This actually ties in really well but absolutely coincidentally with a new gig I’ve taken on as a Rogers Mobile Ambassador. More about that soon!

So how are you and YOUR iPhone doing after upgrading to iOS7? Have you found it troubling? Any other tips to share? Ha, what ELSE don’t I know??? 😉

Royalty Free Images Aren’t Free: Finding and Using Photos to Use Without Getting Sued

Have I ever mentioned that I won our school district’s speech competition when I was in Grade 7? I have always loved public speaking. I’ve been really lucky in the last few months in that I’ve had a terrific number of opportunities to do what I call my “blog and pony” show to internal GoC audiences, talking about how we’re using social media to connect with Canadians in a government context at work, but this opportunity was especially exciting for me. I had the great honour today of speaking at the Social Capital Ottawa conference on a topic very dear to my heart: how to find, use and share photos online without getting sued. (Remember my infographic?) I love this topic because it’s at the intersection of a whole whack of things I’m passionate about: social media, blogging, sharing and photography.

This whole experience has been a HUGE learning curve for me – and I thought I was pretty knowledgeable when I proposed the topic! I learned SO MUCH about copyright and how not to violate it. Did you know, for example, that the DMCA does not necessarily apply in Canada? Or that “fair use” is an American concept and different from our Canadian “fair dealings”? Or that “royalty free” does not mean “free”? (Okay, I knew that last one, but I didn’t know it eight years ago when I started blogging.)

But I learned some other really neat stuff, too – like how to build a Powerpoint deck that doesn’t have 800 words on every slide (unlike almost every Government of Canada internal “deck” I have ever seen), and how to share a presentation on slideshare, and how to administer a quiz and record the results in real time using Google docs, and how to use storify to capture a story on Twitter. And now I’m going to wrap it all up into one big bundle and blurt it out here for your adoration.
Continue reading “Royalty Free Images Aren’t Free: Finding and Using Photos to Use Without Getting Sued”