Okay, so you’re trying to take a picture of your brand new puppy: a tumbling, squiggling ball of golden fur. It’s late afternoon and the light is low. What can you do?
My first recommendation? Don’t use a flash, and especially don’t use the in-camera flash that pops up in automatic mode. I’ve learned over the past year that the in-camera flash gives a cold, unflattering flat colour to your subject, and casts harsh shadows.

See the red-eye, the harsh shadow, and the flat grey tone of Tristan’s skin? Flash = evil!
Okay, so no flash. What to do, then? First, move your puppy near a window. Not in the direct sunlight, but within six feet or so of a nice, bright window. The diffuse light will make some lovely and gentle contrasts but no harsh shadows.
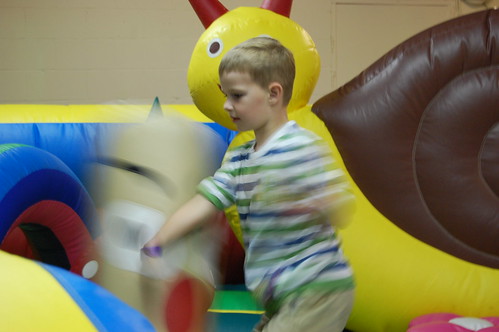
You’ve got some nice warm light, and the puppy is chewing adorably on one of your old shoes. You take the picture — and when you look at the LCD display, all you see is a blur of yellow fur. Because you didn’t use the flash and the light is low, the shutter speed wasn’t fast enough to “freeze” the motion of the energetic puppy.
What can you do? Well, you could turn on some more lights in the room, but that might ruin the nice tones and shadows you’re getting from the window light. There are three things you can do to control the amount of light getting into your camera and improve your picture:
(1) Open up the aperture.
(2) Slow down the shutter speed.
(3) Boost the ISO.
The first thing you should try is opening up your aperture to a nice fat f-stop like f/2.8 or f/3.5. You want a little f-stop number, which means a big opening, so lots of light will get in. That also means, though, that you’ll have a really shallow depth of field, which is how much of the image is in focus. You can use that creatively, so when you focus on your puppy, you can throw your ugly couch in the background out of focus and avoid the distraction of the pile of newspapers on the coffee table behind him.
If you were taking a picture of something that wasn’t moving, like your sleeping puppy, another option would be to slow down the shutter speed. The shutter speed also controls how much light gets in, but the longer the shutter is open, the more likely movement will lead to a blurry subject. If you are using a shutter speed any lower than 1/60 of a second, you should probably be using a tripod, or bracing your camera on a solid surface.
Sometimes, you can use a slower shutter speed creatively to emphasize movement.
So you’ve maxed out the aperture, and you can’t use a shutter speed any less than 1/250 of a second or so because the puppy is a wiggling mass of energy, but the images are still not crisp enough. What can you do? Try boosting your ISO.
In a film camera, ISO (or ASA) refers to how sensitive the film is to light. In Digital Photography ISO measures the sensitivity of the image sensor. A lower ISO gives you pictures that are more crisp, but a higher ISO lets in more light so you can shoot a at a faster shutter speed, thus letting in more light, thus reducing motion blur. I leave my Nikon D40 at the lowest ISO setting (200) and only adjust it if I need more light. The only problem with higher ISOs is that at really high settings (depends on your camera, but usually at 1200 or more) you start to get “noise” which is a grainy quality to your images that’s especially noticable with printed enlargements.
So there’s three easy ways to control the light so you can take stunning photos of your adorable new puppy. And, completely unrelated to light, here’s three more tips to improve your puppy pictures:
- Get down low. Shoot at puppy’s eye level, or even lower if you can.
- Get in close and fill the frame.
- Focus on the puppy’s eyes. If you get the eyes in focus, the portrait will work. If you miss focusing on the eyes, something just seems “off” about a portrait.
So what do you think? Is this stuff helpful or boring? Anything else you’d like to talk about? I’m weirdly intimidated by these posts all of a sudden, maybe because I’m in an insecure place in my own picture-taking right now. And by all means, please do share your ideas and thoughts for controlling the light!
re: flash/lighting/effects.
Right now I’m experimenting with Rear-Curtain Sync. It is very cool, but tricky. I’ll let ya know how it goes!
Oh, fun effect! I played with Rear-curtain Sync at Tristan’s birthday party this year:

I for one love these posts, your simplicity is endearing, now, off to go try a few of your tips
I love how much you teach me… tragically with my point & shoot none of this really applies to me but I’m going to bookmark this post and when I get my dslr (hopefully one day), I’m going to reread it and practice!
Very helpful–thanks. I wish the photography class I took last year had been this explicit.
me four… love it. i’ve tried to read things and even went to a Nikon class here in NY where I learned some things but nothing as explicit and easy to follow as this … please keep the tips coming!!
What I’d like to know is how to know when they’re actually a problem with your camera/lens/equipment that can not be attributed to user error. WHEN should you pay to have your camera looked at? HOW OFTEN should you pay to have your lens/sensors cleaned?
Thanks all for the encouragement! I’m glad you find these helpful! They’re helpful to me in writing them, too.
Amy, I had my D40’s sensor cleaned at Vistek on Bank St just a couple of weeks ago for the first time since we bought two years ago (they do it on the spot, Henry’s sends it to Mississauga and it takes weeks and I was willing to pay out of pocked — $40 — to have the same-day service.) They’re so terrific there, if you think your camera is out of alignment just bring it in and chat with them. Henry’s is good, too, but I’m a Vistek fan now. I was just in there today, in fact, buying a monitor calibration thingee, and ended up chatting for a while about the external flash option for the D40. Oh, and not to be a Vistek shill, but they’re having a Nikon demo day all day Saturday where you can bring in your camera and lenses for a check-up, now that I think about it. I think it was 9 am to 4 pm on June 13.