Ask the audience: on soup and non-non-stick pans

Hey bloggy peeps, I have two domestic questions for you today. Please save my family from my domestic obliviousness!

First, I was surprised to read this summer that non-stick pans can release carcinogenic chemicals, apparently to such an extent that people with birds never use them for fear of killing the birds. That was enough to encourage me to reconsider using them… and then I realized that pretty much *all* the pans, cookie sheets and muffin tins in my cupboard have some sort of non-stick coating.

I’ve started small and bought a (really big) stainless steel frying pan. I actually really like it — it’s deep, with a thick bottom, and it transfers the heat really evenly. But, I cannot figure out how to not burn whatever I’m cooking to the bottom of the pan. I’ve added extra butter and oil, cooked faster with higher temps and slower with lower temps, and no matter what I do, I burn the snot out of the bottom of the pan every.single.time.

Am I missing something? Before I take the plunge and give up the rest of my non-stick-ware, which I really do want to do, do I need to take some remedial cooking lessons?

Second, I picked up a really interesting lentil, barley and noodle soup mix from the store, but I am a relative soup virgin. The family likes soup, but I been intimidated by making them from scratch. So I can probably just dump the lentil and noodle mix into some chicken or vegetable stock, but what else can I do to it? Just dump in random veggies? Ugh, I have come a long way in the kitchen in the last few years, but home-made soups have thus far intimidated me.

Help!

Green. Yellow. Red.

No, not a stoplight. No, those are the colours of the three crayons that were in the pocket of his winter coat. When I washed it. And dried it. Along with his only pair of ski pants, and both of his brothers’ only winter coats. And ski pants.

I can tell you now with the voice of experience: three crayons? Can make one hell of an unholy mess.

I spent the first 15 minutes frantically googling “crayon melted in dryer.” A lot of the sites, including the official Crayola stain-removal site, advocated the use of WD-40. Seriously? Oil? In my not-yet-six-month-old dryer? Um, no.

I spent the rest of the first hour hanging half way out of the dryer, scrubbing the snot (well, wax) out of the interior drum with one of those plastic pot scrubber jobbies and then wiping it clean with an old towel. Run on hot for 10 minutes to get everything melty, and repeat. Oh and by the way? When it’s hot enough to melt the wax, the dryer is not so much a comfortable place to hang out.

The next hour I spent trying to get the baked-on wax off of the lint trap. Seeing the effectiveness of heat in the wax-removal process, I briefly debated nuking the lint trap to loosen up the worst of the wax, but I couldn’t be sure that the screen was not either metal or meltable. And having just finished lunch I wasn’t particularly hungry for sautéed lint trap anyway.

sacrificial lint trap

In a flash of brilliance, I boiled a kettle and poured the boiling water in small doses onto the lint trap to loosen the wax. This worked really well except for the part where the lint trap is porous and I poroused boiling water all over my hand, resulting in the first (but not last) official burn of the day.

About ninety minutes into the project, I had stopped envisioning ways to exact revenge on both the boy who thinks winter-coat-pockets are an ideal place to store crayons and the boy who played in the mud in his ski pants and inspired me to wash everyone’s snow suits in the first place. In fact, I’d hit a zen kind of headspace where the mindlessness of the work — pick at crayon embedded in crease with fingernail, run under hot water, pick again, scrub with corner of old facecloth, repeat, repeat, repeat — allowed me to write some really excellent blog posts in my head. Oh, but this blog post is not one of them. Nope, I forgot all of those clever, witty and endearing ones when a squirrel ran past the window.

(Joke: How many ADD kids does it take to change a lightbulb? LET’S GO RIDE OUR BIKES!!! Bwhahaha, it’s funny cuz it’s ME!)

Interestingly, apparently our lint trap is the only one in existence with 375 sides. I say this because that’s exactly how many times I sighed in satisfaction at finally liberating the lint trap from its waxy pox, only to turn it over and find a fresh patch of baked-on crayon scat.

Two kettles of water later, the lint trap was now the cleanest ever known to man and I was intimately familiar with each crack and crevice. Why they make lint traps with so many wax-friendly crevices is beyond me, by the way. When I’m Queen of the Universe the very first thing I’m going to do is de-crevice all the lint traps, so help me god.

Now more than two hours into Operation I-Hate-Crayola, I set up the ironing board and proceeded to iron an entire roll of paper towels. I can now assure you we have the crispest, flattest paper towels in town. Because nothing says “productive use of a precious Sunday afternoon” like ironing paper towels. In fact, all the time spent ironing those paper towels gave me plenty of time to think about the things that I could be achieving, like cleaning the house. Or reading a book. Or earning a graduate degree in quantum physics. Or having a root canal. I’d’ve been happy doing just about anything, in fact, defined as several hours of not ironing paper towels.

Oh yeah, and the iron? Second official burn of the day.

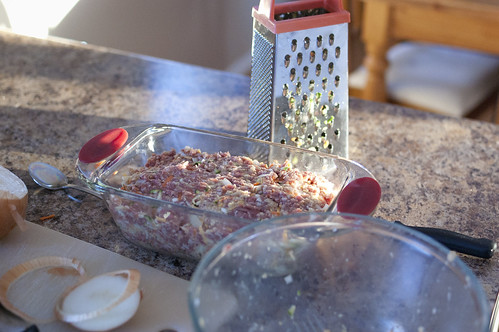
Now, to give credit where credit is due, I was tickled at how effective the ironing-the-paper-towel trick turned out to be. Melted crayon magically disengages from snowsuit and adheres to paper towel when you press a hot iron to it. Well, yellow crayon completely disengages itself from snowsuit fabric. Green comes most of the way out. And red? Well, red doesn’t really seem to bond with the paper towel at all. In fact, they seem kind of adversarial. I’m thinking maybe red crayon and paper towel used to go out, and then when paper towel started wanting different things, red crayon took the breakup really hard and left all sorts of drunken, late-night messages on paper towel’s answering machine, because really? They didn’t hang out together at all.

And yes, you bet your ass I did in fact go through all the crayon boxes in the house (yes, we have a few) and picked out all the red crayons and threw them in the trash as a preemptive strike. Cuz you know there’s going to be a next time.

Don’t worry, the story has a happy ending. After one hour of scrubbing the dryer drum, one hour of dewaxing the lint trap, two hours ironing paper towels and snow-suits and one 75 minute sanitary wash, all three snowsuits are virtually crayon-free. Close enough for end-of-season, anyway.

My fingernails, on the other hand, are a green, yellow and red write-off…

Happy dance for BBQ season!

Dear Ottawa friends,

I’m so very sorry. That very rude awakening you had today, where winter totally barged right back in after allowing spring to take a toe-hold, and we got a nasty dump of two fresh inches of snow after 98% of the old snow had melted away?

Totally my fault. Sorry about that.

I got a little too excited about spring this week. I bought a new BBQ. And a picnic table. And oops, I might have gone right ’round the bend and also picked up an adorable (and totally affordable) little bistro set from Ikea that will be absolutely smashing for morning coffee on the porch.

Oops. Sorry. After a whole winter of restlessly anticipating the outdoor season, I kinda forgot that the first taste of spring is not the one that stays.

Speaking of tastes of spring, though, before it got all snowy and slushy and January again, I danced and pirouetted my way through the grocery store on the weekend. Whereas I usually find meal planning to be an onerous task, I was practically skipping through the aisles as I loaded up my cart this week. Why the gleeful shopping?

It’s BBQ season, baby! *cue the heralds of chorusing angels*

Our old barbeque did not survive the transition to the new house last October. I’d already replaced the burner once and it was starting to rust through again. The grills were looking sketchy, and the move knocked the handle off. I usually barbeque well into November or December each year, and with the early end to the season I was drooling with desire for our outdoor grilled faves by the end of January.

As the snow piled high and then receded, I scrolled through pages of reviews of various barbeque configurations online, dreaming of hamburgers and grilled chicken fajitas and steak-and-veggie skewers. I think it was shortly after Christmas that I set up CanadianTire.ca’s sale alert feature on a few of the most promising models, hoping to score a good deal on one. With the milder weather this month, I was just starting to think about scrapping the sale alert and going ahead and buying one when I got the e-mail: the barbeque you’ve been watching is going on sale this week. Yay!

And that’s how I ended up with a dreamy smile on my face, dancing through the aisles of the grocery store, greeting seasonal favourites I hadn’t seen in six months like old friends. Hello hamburger buns, how I’ve missed you! Oh darling tzatziki and feta couscous salad, you’re looking delicious today! And ribs, sweet and succulent ribs, I’ve been salivating over the idea of you for months!

175:365 BBQ night

I’ve been in a terrible food rut the last little while. I’ve got maybe ten or a dozen meals that I’ve been cycling through, and while they’re good, I’m sick to death of them. Pasta and salad, chicken fingers and veggies, Tiki Masala shrimp with naan and rice, chili, tacos, meatloaf — all plenty yummy, but gah, I’m so bored with them.

Given the chance, I’ll grill dinner five nights out of seven, so the return to BBQ season is a drastic difference for us. Do you find that your grocery shopping habits change with the season?

As for me, I’ll be standing on the back patio tonight with my scarf and mitts and winter boots, grilling up some chicken breasts. It’s spring, dammit, and you can’t make me go back to winter food!

Four food-group meatloaf recipe

My friend Nancy sent me this recipe years ago, and I love it. LOVE it! It’s easy, it’s tasty, and it’s got all four food groups in it. What more could you ask of a humble meatloaf?

(I’ve become a bit of a snob about my ground beef lately, and have found that this dish tastes even better if you can get locally raised, sustainable and anti-antibiotic ground beef from your butcher, FWIW.)

meatloaf

Here’s what you need:

2 eggs
2/3 cup milk
3 slices bread
1/2 cup chopped onion (sweet is nice here)
1/2 cup shredded carrot
1 cup shredded cheddar
2 tsp salt
1/4 tsp pepper
1 1/2 pounds (675 grams) ground beef
1/2 cup ketchup or chili sauce or salsa
1/4 cup brown sugar
squirt of mustard

Mix the eggs and the milk in a big bowl. Tear the bread into small pieces, and stir into the milk/egg mix, beating until the bread disintegrates. Add the onion, carrot, cheese and mix. Add in the beef and mix some more. Pack it into a 9 x 5 loaf pan (mine is pyrex).

In a measuring cup or small bowl, mix brown sugar and mustard with ketchup or chili sauce or salsa or BBQ sauce or some combination of all four. Quantities are not really important for this bit, just mix up a sauce that’s yummy to you. Spread half of it over the top of the meatloaf, and reserve the rest.

Bake for 1 hr 15 mins at 350F. Let stand another 10 minutes when complete. Serve with reserved sauce for dipping. Yum!! We make baked sweet potato fries and garlic balsamic green beans on the side, or baked beans with a leafy salad. Did I mention yum??

Five steps to the perfect grilled hamburger

It’s true, not that long ago I considered “cooking” to be preheating the oven and opening the box. It’s also true that while I’m a bit of a Johnny-come-lately to the wholesome food movement, I’ve embraced it with my whole heart. When I was blogging the other day about my 5-ingredient chicken fingers, it got me thinking about some of the other culinary skills I’ve acquired over the last couple of years.

You know what I cook really well? Hamburgers. Grilled hamburgers. My mouth is watering just thinking about it! And so with a weekend pending and BBQ season upon us, I thought I’d share five tips to hamburger perfection. (No, my entire cooking repertoire does not revolve around the number 5. I don’t think.)

1. Start with ground meat. What I mean here is forget the frozen pucks, and skip the pre-formed fresh patties, too. Did you know you pay more just for them to make little circles out of your ground beef? Take off your rings and get your hands dirty, it’s worth it! (I haven’t tried ground chicken or turkey yet, but more power to you if you can get away with it. My persistently low iron likes a little red meat a couple of times a week! And while extra lean is best for you health-wise, the extra fat in lean pretty much burns off on the grill, so you can save a few more pennies there.)

2. Don’t overhandle the meat. Break it up with a fork in a big bowl. Dump some breadcrumbs or oats on top, and either a whole egg or just the yolk. Add a little salt and pepper, and if you’re like that, chop up 1/4 cup or so worth of onions and throw that in there. A splash of Worcestershire sauce gives it a little zing, too! Stir it up just enough to combine the ingredients, but try not to overmix it.

3. Make perfect patties. I finally figured out how to keep my burgers from bulging in the middle. I take roughly enough hamburger so that I can close my hands around it, and rather than making a ball and then squishing it into a patty, I form it directly into a disk. A fine distinction, ’tis true, but it makes the difference in a burger you can get your jaws around!

4. Only flip it once. This is key!! On a hot grill, cook for about six minutes, flip, and cook for another five. Baste with bbq sauce if you must — I often forget. If you’re making cheeseburgers, add cheese and cook for one more minute… just enough to make it melty but not runny. Again, it’s a fine distinction!

5. Use the new skinny buns. Have you tried them? A nice crusty kaiser bun is nice, too, but we love those new thin whole-wheat buns. A little bit of a chewy compliment to the burger itself, and just perfect!

Creatures of habit that we are, we usually have baked beans and a nice leafy salad with hamburgers. What do you think? At the very least, now I know what I’m making for dinner tonight!

Edited to add:
as I was typing this up, I knew I was forgetting something! Bonus tip: do not, under any circumstance, squish the patties on the grill!! All the yummy juicy moisture will run out, and your burgers will be dry.

Super-easy five-ingredient chicken nuggets

In our conversation about Jamie Oliver’s Food Revolution, Vicky asked for my recipe for chicken nuggets. I’m happy to share — I wish I’d started making them like this 10 years ago!

For the five of us I use three chicken breasts, although I’m going to have to start making up a fourth soon — the boys get to the end of their chicken before they get to the end of their appetite! You need: chicken breasts, bread crumbs, seasonings to taste (I use chili powder and a little fresh ground pepper, sometimes some oregano), milk and white vinegar.

You also need two flat-bottomed bowls or deep plates. In one bowl, dump your bread crumbs and seasonings. I use about 3/4 of a cup of breadcrumbs. In other bowl, dump 1/3 of a cup of milk (I’m speculating about the measurements here — that’s why I like cooking instead of baking. Accuracy is not one of my strengths in the kitchen!) and drop a capful of vinegar into the milk. I know, that sounds disgusting, but it turns the milk into buttermilk and thickens it up a bit. Trust me! Also, lay out your baking sheet so you have an assembly-line — chicken then milk then crumbs then cookie sheet.

Cut your chicken into nugget or strip sized pieces. I usually cut off the filet first, then cut across the width in two inch strips, so each breast gives eight to ten pieces. Dunk in the buttermilk mixture, roll in the crumbs, pushing down a bit so they stick really well, and place on the cookie sheet.

Bake for 20 minutes at 400F, turning half way. Serve with your family’s favourite dipping sauces!

For a variation, I’ve used caesar salad dressing instead of the buttermilk. It’s a little messier, but a nice variant.

So it’s your turn — I’m always looking for side-dish ideas. Care to share your ideas for a nice healthy side for chicken nuggets?