Here’s something new I’ve been thinking about sharing on the blog – more sophisticated tips and tutorials for photography. This is a fun little trick I learned this year and I thought I’d share it with you. Want to make a fun winter photo even more wintry-looking? Add a little snow with Photoshop!
First, you need Photoshop Elements or just about any version of Photoshop. I love Lightroom for most editing purposes, but when it comes to cloning out unwanted bits or playing with layers, nothing beats Photoshop! Second, you also need to download these fun (and free!) snow textures from Florabella.
Open your photo and one of the snow texture files and drag the snow on top of your original photo. This is the important part: make sure you set the blending mode to SCREEN and not overlay. I think it’s the inclusion of the word ‘overlay’ in the title that keeps messing me up here, and it took me forever to figure out why I couldn’t get these to work. SCREEN blending mode!
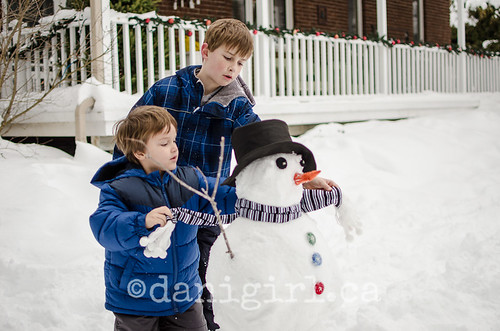
Adjust the opacity to taste. I also like to add a layer mask at a low opacity and randomly lighten spots, especially over key detail areas. For this image, first I duplicated the background layer and set the blending mode to multiply to punch up the contrast, and then I added the snow layer.
Here’s the original:
Here’s the version I took in the blizzard:
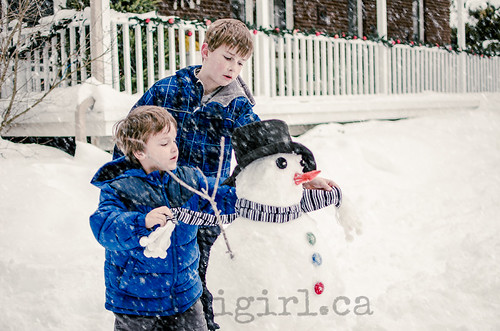
What do you think? Would you have guessed the snow was added in post production?
Being married to a photoshop lover I am used to picking over his work so maybe I am a bit more sensitive to it – the only thing that would have given it away is that the “heaviness” of the fake snow would have some accumulation on their heads or snowman’s hat. However, is it just me or do the boys faces appear whiter in snow picture?
But I do have to wonder would I have noticed had it not been the comparison you gave,
Oooo, you have a great eye! Yes, the lack of accumulation is a good giveaway, and yes I did use a bit of a frost preset after I applied the snow layer. Now I know where to come for a critical eye! 🙂
That’s a cool technique, but I think I prefer the warm tones of the first image. it’s fun to play around with all that technology has to offer us though !
Ya Sarah, I hear you. I liked how the coolness complimented the subject and gave a little extra pop and defnition to their hair and facial features, but I waffle about whether I like the original or the cooler version better. I think the big risk in playing with presets like the cooler, frosted tone in this one is that what looks good now will look dated in just a few years, but straight clean processing will always be in style.
Ha! I would not have known if you didn’t tell me.